[요약번역]GDC 2023 - Real-time Sparse Distance Fields for Games 파트-2 알고리즘
역자의 말.
파트 2 도 역시 겨우 마쳤습니다. 힘드네요... ;;;;
파트 1은 여기에..
[요약번역]GDC 2023 - Real-time Sparse Distance Fields for Games 파트-1 개요
역자의 말. 번역 주제를 딱히 정하지는 않지만 meso structure 에 대해서 좀 살펴보다가 Youtube 타고 뭐 좀 찾다보니 오랫만의 GDC2023 에서 AMD 가 공개했던 발표내용이 있어서 차분하게 번역 해 봅니다.
techartnomad.tistory.com

그렇다면 브릭셀라이저는 방금 말씀드린 이 디스턴스 필드를 어떻게 생성할까요?
So How does Brixelizer generate this distance field that I just talked about.

따라서 이 작업은 각 캐스케이드에 대해 개별적으로 수행됩니다. 브릭셀라이저가 있는 경우 업데이트 함수를 호출하면 이 업데이트는 하나의 캐스케이드에만 적용됩니다. 그렇기 때문에 씬에 두 개의 캐스케이드가 있고 둘 다 업데이트하려면 업데이트 함수를 각 캐스케이드에 대해 한 번씩 두 번 호출해야 합니다. 디스턴스 필드인 AABB 트리를 생성하는 전체 프로세스는 복셀화 파이프라인을 통해 수행됩니다.
So, this is done for each cascade separately. If you have Brixelizer, We call an update function, and this update will only act on one cascade. So if you have, let’s say, two cascades in your scene, and you want to update them both, then you have to update, well, then you have to call update twice, once for each cascade. The whole process of generating the distance fields, the AABB tree, is done via a voxelization pipeline.

복셀화 파이프라인은 크게 두 가지로 나눌 수 있으며, AABB 트리 구조는 세 부분으로 나뉩니다.첫 번째는 복셀화 부분입니다.이 부분에서는 표면과 교차하는 그리드 셀을 식별한 다음 브릭을 할당합니다.여기서는 용어를 좀 더 일관되게 하기 위해 각 그리드 셀을 복셀이라고 부르겠습니다.표면과 교차하는 복셀을 결정하고 나면 브릭을 생성한 다음 두 번째 단계인 각 브릭으로 이동하여 거리 필드 정보로 채웁니다.또한 AABB를 생성하여 상향식 AABB 트리를 구축하는 데 사용합니다.
And the voxelization pipeline can be roughly separated into two, with the AABB tree construction into three parts. First is the voxelize part. So in this part, We identify the grid cells that intersect with surfaces, and then We let it allocate the Brick. And in the following, I will call each grid cell a voxel, just to be a bit more consistent with the terminology. Once We determine which voxels intersect with surfaces, We create a Brick, and then We go to the second phase, Where We go into each Brick and fill it out with the distance field information. We also generate the AABB, Which is then used to build bottom-up the AABB tree.

따라서 맨 처음에는 원거리 필드에서 처리할 씬의 지오메트리와 AABB 목록인 입력이 있습니다.그리고 먼저 계산 시간을 낭비하고 싶지 않기 때문에 AABB가 캐스케이드 그리드와 교차하지 않는 모든 지오메트리를 제거하기 위해 일반적인 컬링을 수행합니다.
So, in the very beginning, We have our input, Which is the list of the geometries and the AABBs from our scene that we want to process in the distance field. And first, We do some general culling to get rid of all the geometries whose AABBs do not even intersect the cascade grid because We don’t want to waste any computation time on them/
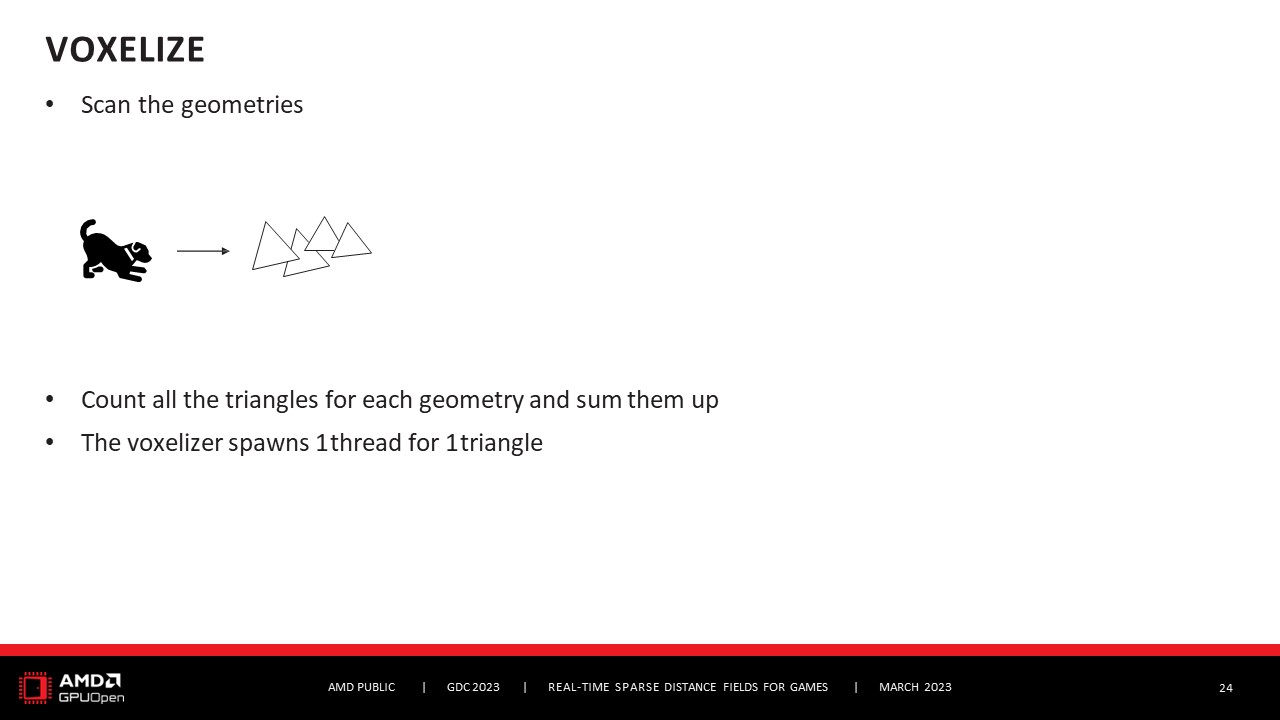
그런 다음 복셀화 부분 자체부터 시작합니다.이를 위해 모든 지오메트리를 스캔하고 그 안에 있는 트라이앵글을 계산합니다.그런 다음 각 삼각형에 대해 하나의 스레드를 생성합니다.
And then We start with the voxelization part itself. And for this, We scan all the geometries and count the triangles they have. And then for each triangle, We spawn one thread.
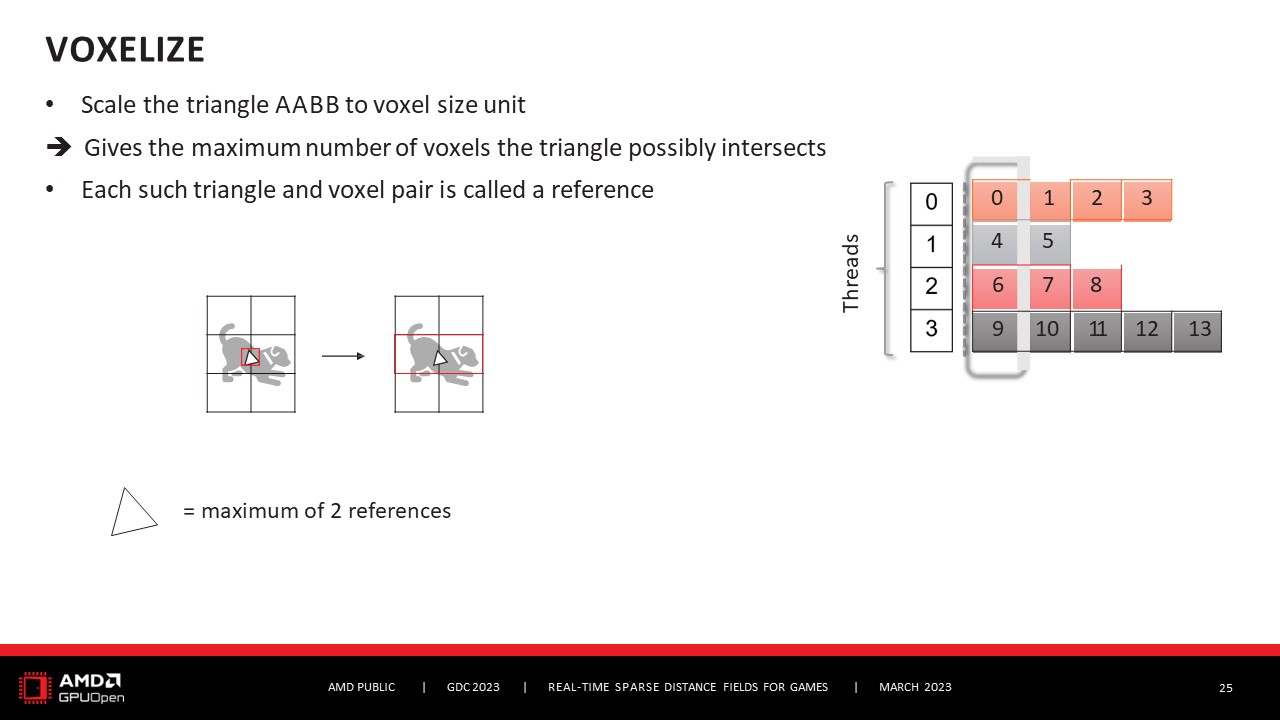
그리고 각 스레드는 삼각형의 AABB를 스케일링합니다.따라서 하나의 스레드가 하나의 삼각형을 담당하고, 삼각형을 복셀화 단위로 스케일링하여 볼륨을 간단히 취할 수 있기 때문에 이를 수행합니다.복셀화 단위로 스케일링하면 AABB의 부피를 구할 수 있기 때문에 가능한 삼각형-복셀 조합의 최대 개수를 얻을 수 있습니다.즉, 이 삼각형이 교차할 수 있는 최대 복셀 수입니다.슬라이드의 이 작은 예시에서 삼각형은 AABB이고, 복셀화 단위로 크기를 조정하고, 볼륨은 2입니다.따라서 이 삼각형이 교차할 수 있는 최대 복셀 수는 2입니다. 이렇게 하면 각 삼각형에 대해 가능한 삼각형-복셀 교차 목록이 제공되며, 이러한 삼각형-복셀 쌍을 각각 참조라고 합니다. 따라서 각 삼각형에 대해 참조 목록이 있습니다.
And each thread scales the triangle’s AABBs. So one thread is responsible for one triangle, and it takes the triangle’s AABB, It scales it to be at Voxelized unit, and it does that because then We can simply take the volume. It to be at Voxelized unit, and it does that because then We can simply take the volume of the AABB, and this gives us the maximum number of possible triangle-voxel combinations. So the maximum number of voxels that this triangle can intersect. So in this small example on the slide, We have the triangle, It’s AABB, We scale it to be Voxelized unit, and the volume of it is 2. So the maximum number of voxels this triangle can intersect is 2. And this gives us, for each triangle, a list of possible triangle-voxel intersections, and each of these triangle-voxel pairs is called a reference. So, We have for each triangle, a list of references.
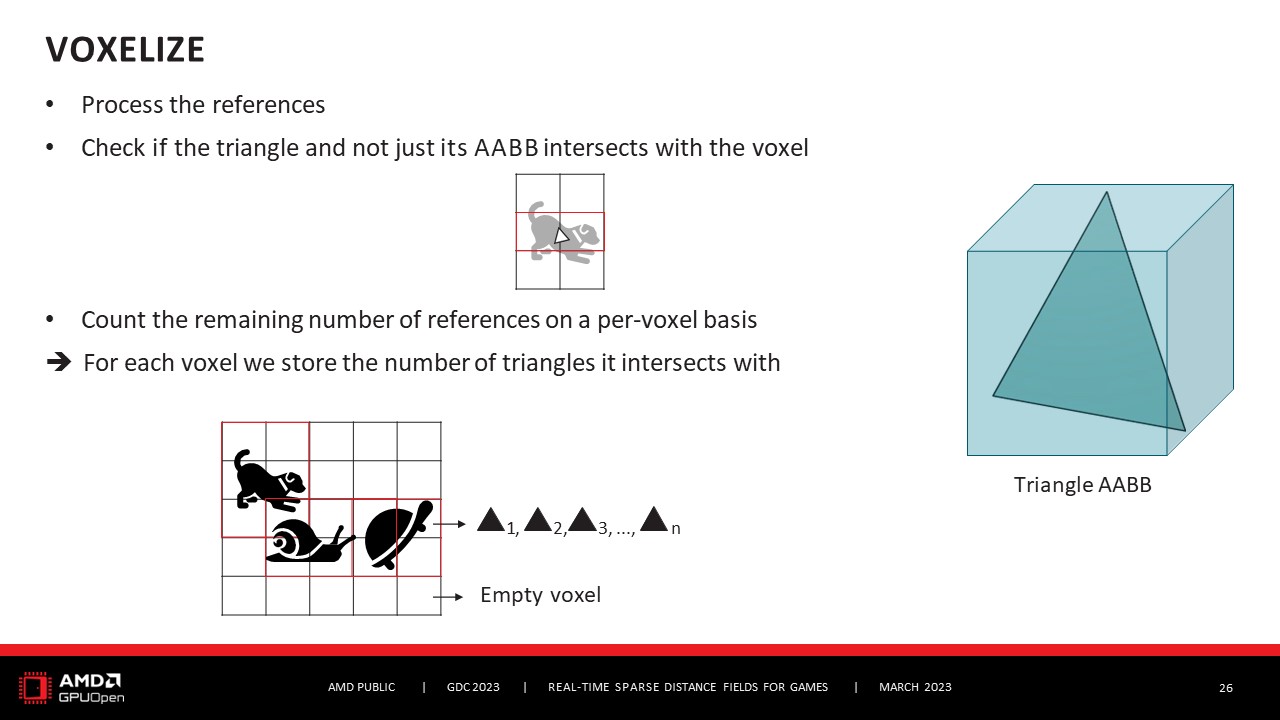
다음 단계는 이러한 참조를 처리하는 것입니다. 실제로 유효한 참조인지 확인해야 하기 때문입니다.따라서 삼각형이 이 복셀과 AABB뿐만 아니라 실제로 교차하는지 확인해야 합니다.이렇게 하면 복셀과 실제로 교차하는 삼각형의 목록이 완성됩니다.이것이 이 단계의 최종 결과이며, 각 복셀에 대해 삼각형 목록이 생깁니다.그리고 이것은 또한 빈 복셀을 식별합니다.따라서 빈 복셀의 경우 이 단계에서 완료됩니다.
The next step is to process these reference, because we need to verify if it’s actually a valid reference. So, If our triangle really intersects this voxel, and not just its AABB. And this way, We end up with a list of voxels and the triangles it really intersects. So this is the end result of this step, that we have for each voxel a list of triangles. And this also will identify the empty voxels. So for empty voxels, we are done at this stage.
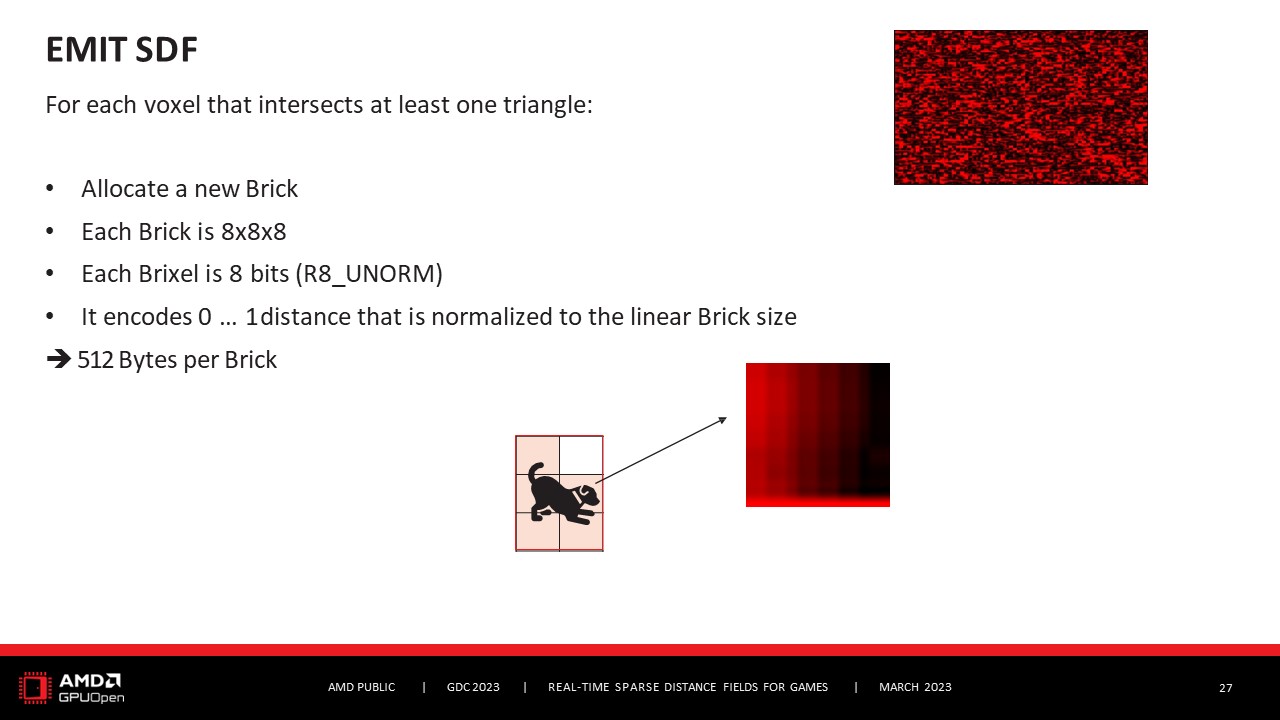
비어 있지 않은 복셀의 경우 새 브릭을 할당합니다.각 브릭은 8*8*8입니다.각 브릭 셀은 8비트입니다. 0과 1 사이의 거리를 인코딩하고 선형 브릭 크기로 정규화합니다.이것은 정보를 읽을 때 중요합니다. 따라서 각 브릭은 512바이트입니다.이제 새 브릭을 할당합니다.
For non-empty voxels, We allocate a new Brick. Each Brick is 8*8*8. Each brick cell is 8 bits. It encoded the distance between 0 and 1 and normalized to the linear Brick size. This is important when you read out the information. But yeah, So each Bric is 512 bytes. So, we allocate the new Brick.
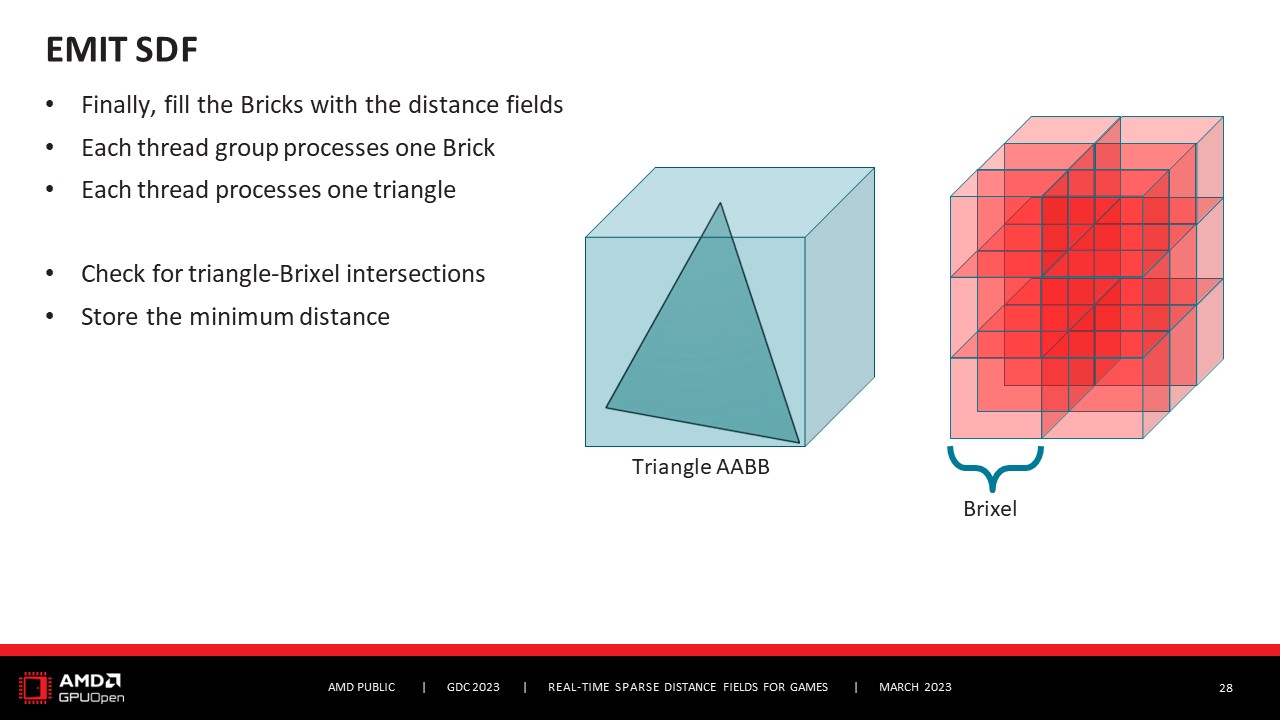
그런 다음 거리 필드 정보로 채우려고 합니다. 그리고 각 스레드 그룹은 하나의 브릭을 처리합니다. 그리고 각 스레드는 하나의 삼각형을 처리합니다. 그리고 삼각형과 브릭셀의 교차점만 확인합니다.따라서 브릭은 브릭 내의 단일 단위입니다. 따라서 교차점을 확인한 다음 최소 거리를 저장합니다.
And then We want to fill it with the distance field information. And each thread group processes one Brick. And each thread processes one triangle. And it just checks for triangle-Brixel intersections. So, Brixel is a single unit within a Brick. So it just checks for the intersections, and then stores the minimum distance.
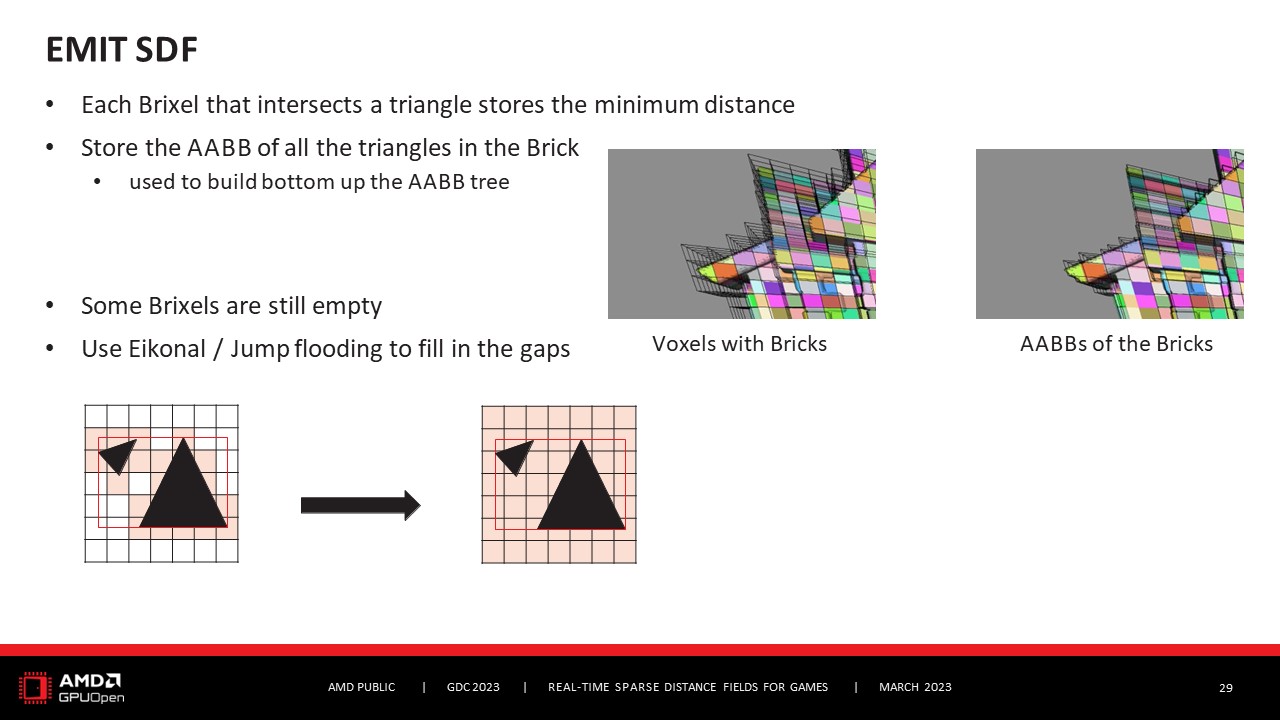
이것은 우리에게 부분적인 거리 필드를 제공한다고 말할 수 있습니다.일부 브릭셀은 최소 거리를 갖기 때문입니다. 그러나 다른 브릭셀은 어떤 삼각형과도 교차하지 않기 때문에 거리가 없습니다.이 단계에서는 브릭에 대한 AABB도 계산하는데, 이는 AABB 트리에 필요합니다.이 단계가 끝나면 일부 브릭셀은 여전히 비어 있습니다. 그래서 다른 단계를 수행합니다. 바로 에이코널을 사용해 빈 공간을 채우는 것입니다. 일종의 점프 플러딩 알고리즘입니다. 이것이 정확히 무엇인지에 대해서는 자세히 설명하지 않겠습니다. 더 자세히 알고 싶으시다면 확인해 보시기 바랍니다. 웹에는 많은 정보가 있습니다.하지만 간단히 설명하자면, 우리가 이미 가지고 있는 정보를 나머지 브릭셀에게 분배하는 방식입니다. 따라서 결국 각 브릭셀에 대해 가까운 표면까지의 거리 정보를 갖게 됩니다.
This gives us a partial distance field, I would say. Because some Brixels will have the minimum distance. But other Brixels, they won’t have any distance because they are not intersecting any triangle. At this stage, We also compute the AABB for the Brick, Which is needed for the AABB tree. So, after this stage, Some Brixels are still empty. So, We do another step. And this is to use Eikonal to fill in the gaps. So it’s a type of jump flooding algorithm. I will not go into detail into what this exactly is. If you want to know more, please check it out. There’s plenty of information in the web out there. But just in short, it’s a way to kind of distribute this information We already have to the remaining Brixels. So, that in the end, for each Brixel, We have the distance information to its closet surface.
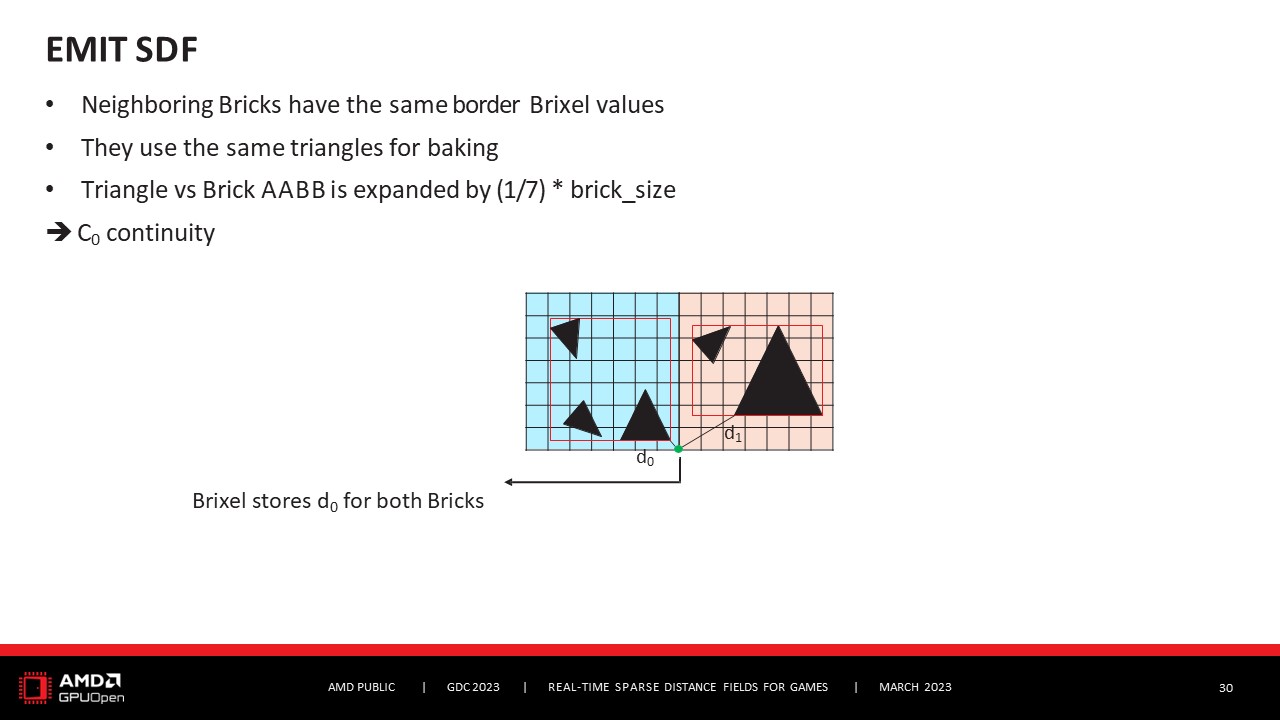
또한 이렇게 거리 필드 정보로 브릭을 채울 때 인접한 브릭은 실제로 동일한 경계 브릭 값을 갖게 된다는 점에 유의하세요. 따라서 이 예시에서는 파란색 브릭과 주황색 브릭이 두 개 있습니다. 그리고 인접한 브릭은 실제로 같은 지점을 인코딩합니다. 그리고 두 브릭 모두에 대해 이 브릭은 주황색 브릭 자체와 교차하지 않는 표면까지의 거리를 인코딩하더라도 주황색 브릭에 대해서도 d0을 저장합니다. 그리고 이것은 삼각형과 Brick의 AABB 교차 테스트를 할 때 삼각형을 약간 확장함으로써 달성됩니다. 이렇게 하면 테두리 브릭 값이 동일한 값을 공유하는 이 속성을 정확히 보장할 수 있습니다. 이렇게 하면 C0 연속성을 얻을 수 있습니다.
Please also note that when we do this, filling out the Brixels with distance field information, that neighboring Briks will actually have the same border Brixel values. So, here in this example We have two Bricks a blue Brick and an orange Brick. And their neighboring Brixels will actually encode the same spot. And for both Bricks, this Brixel will store d0, Also for the orange Brick, even though d0 encodes a distance to a surface that does not intersect the orange Brick itself. And this is achieved by expanding the triangle a little bit when We do the triangle and Brick AABB intersection test. And this is to ensure exactly this property that the border Brixel values share the same value. In this way, We achieve C0 continuity.
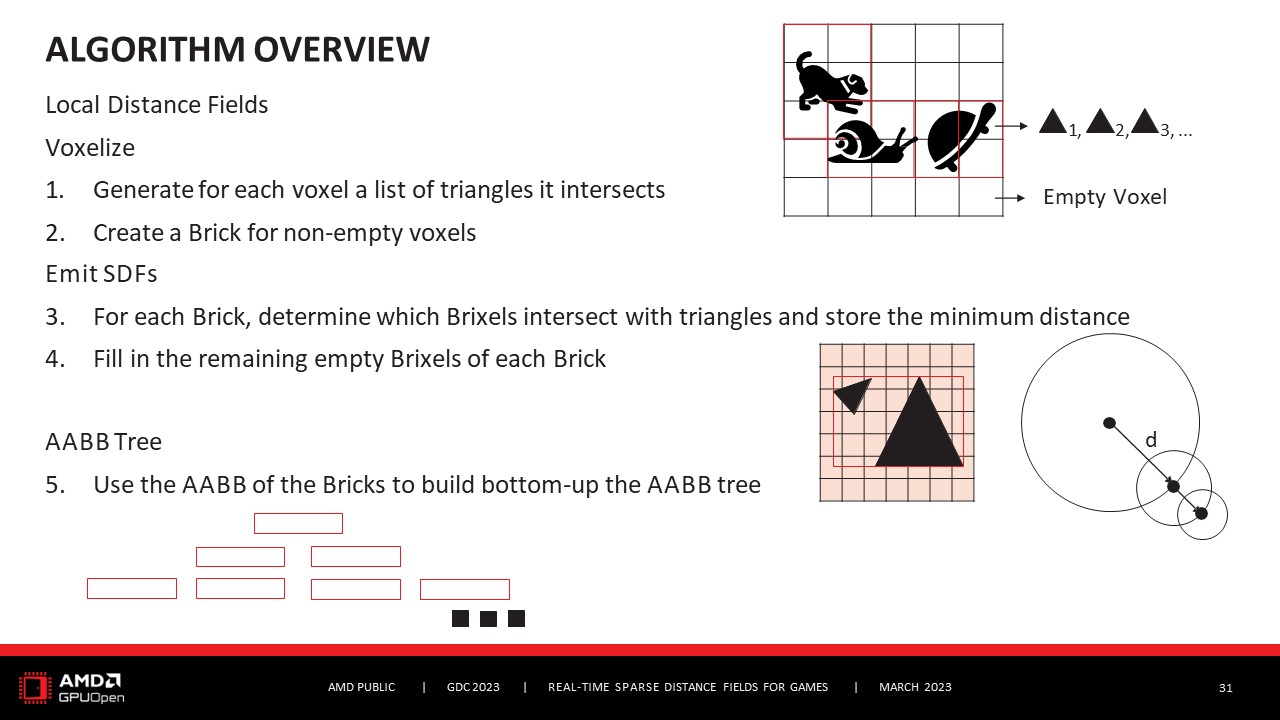
다시 간략히 살펴봅시다. 먼저 씬을 복셀화합니다. 각 복셀이 교차하는 모든 삼각형이 포함된 목록을 얻습니다. 그리고 비어 있지 않은 모든 복셀에 대해 브릭을 생성합니다. 그런 다음 브릭에 대해 거리 필드 정보를 채웁니다. 또한 브릭에 대한 AABB를 생성한 다음, 이를 사용하여 AABB 트리를 상향식으로 구축합니다.
Quick overview again. So, We first voxelize the scene. So, We get a list for each voxel with all the triangles it intersects. And We create a Brick for every non-empty voxel. And then for the Bricks, We fill it out with the distance field information. We also create the AABB for the Brick, Which is then used to build bottom up the AABB tree.

그래서 최적화입니다. 기본적인 알고리즘을 소개해 드렸지만, 실제로 실시간으로 처리할 수 있도록 속도를 높이려면 여기저기서 최적화가 이루어져야 합니다.
So, Optimizations. I presented to you the basic algorithm, but there have to be some optimizations here and there to get it up to speed so that we can actually do it in real-time.
첫 번째 매우 중요한 최적화는 정적 지오메트리와 동적 지오메트리를 구분하는 것입니다. 정적 지오메트리는 매 프레임마다 복셀화해야 하기 때문이죠? 왜냐하면, 제 말은…변하지 않으니까요. 매 프레임마다 복셀화하면 계산이 낭비될 수 있습니다. 그래서 최적화는 이렇게 하지 않는 것입니다.
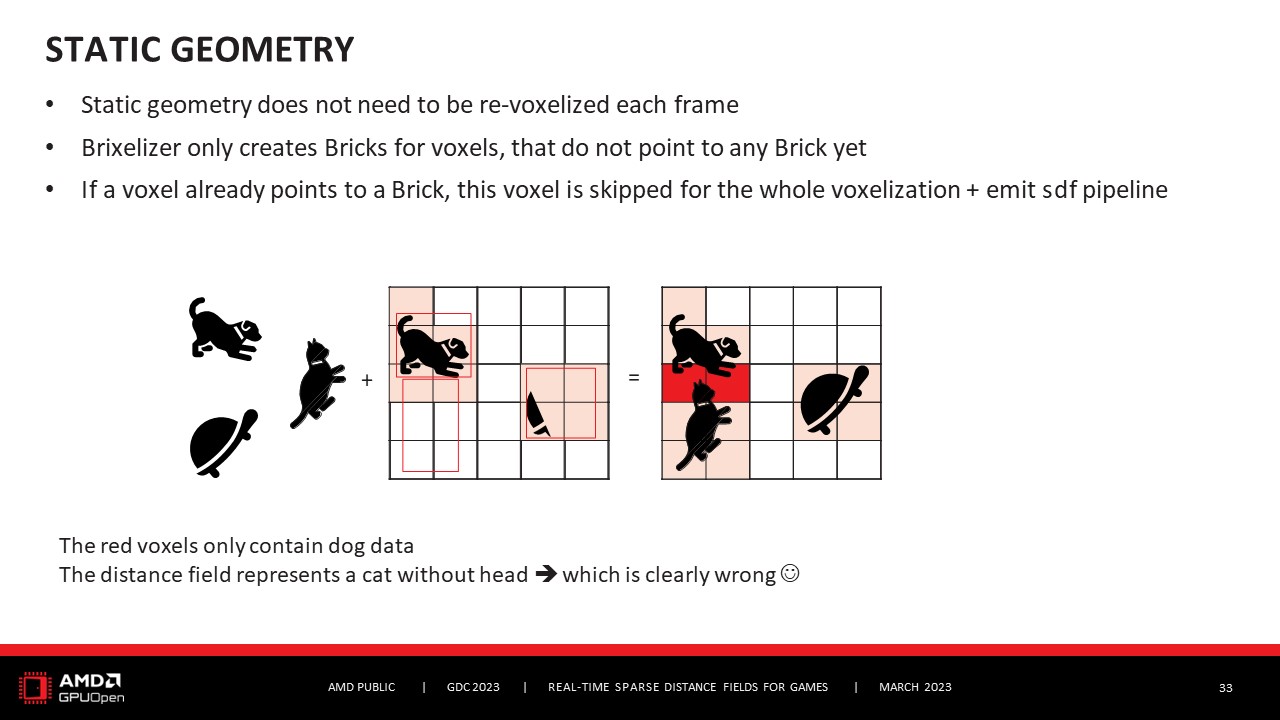
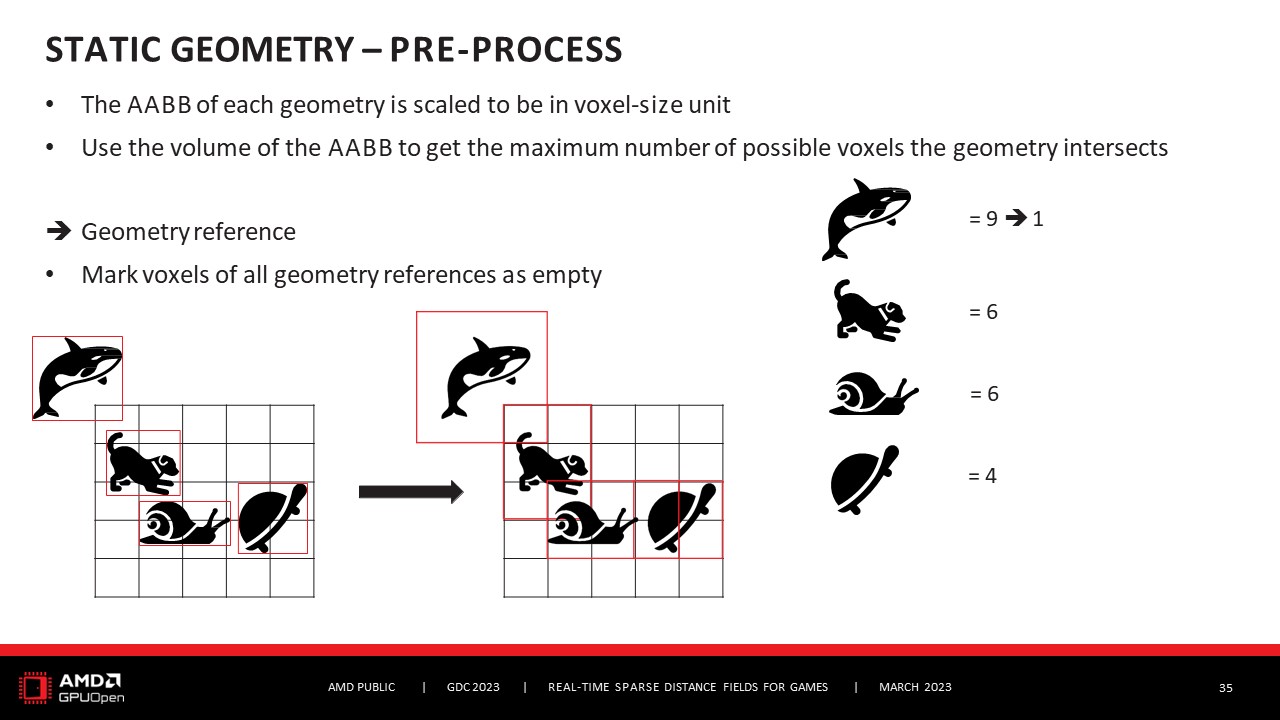
그래서 브릭셀라이저가 결과를 캐시하고 이를 영구적으로 유지하는 방법이 있습니다. 이를 위해 브릭셀라이저는 아직 어떤 Brick도 가리키지 않는 복셀에 대해서만 새 Brick을 생성합니다. 따라서 복셀이 이미 Brick을 가리키고 있다면 이 복셀은 전체 복셀화 과정에서 완전히 무시되고 거리 필드 파이프 라인을 방출합니다. 그렇다면 실제로는 어떻게 작동할까요? 처음에는 완전히 비어 있는 그리드가 있습니다. 그리고 처리하고자 하는 지오메트리가 있습니다. 그리드가 완전히 비어 있기 때문에 모든 복셀이 고려됩니다. 따라서 앞서 설명한 대로 지오메트리가 어떤 복셀과 교차하는지 확인한 다음 해당 복셀에 대한 Brick을 생성합니다. 이제 어느 시점에서 새로운 지오메트리가 들어오면 개가 있고 이제 거북이도 있습니다. 하지만 이 검사를 수행할 때 Brixelizer는 개는 이미 Brick을 가리키는 복셀과만 교차한다는 것을 알아챕니다. 거북이는 빈 복셀과 교차하는 반면 개는 그대로 놔둡니다. 따라서 새로운 Brick을 생성하고 거리 필드를 생성합니다. 따라서 이미 브릭을 가리키는 복셀과 교차하는 새로운 지오메트리를 얻을 때까지는 괜찮습니다. 이제 고양이가 있고 복셀화 프로세스를 다시 수행합니다. 그래서 개가 어떤 복셀과 교차하는지, 고양이가 어떤 복셀과 교차하는지, 거북이가 어떤 복셀과 교차하는지 확인한 결과 고양이는 6개의 복셀과 교차하고 그중 4개는 비어 있고 괜찮습니다. 하지만 그 중 두 개는 실제로 비어 있지 않습니다. 여기에 빨간색 복셀로 표시했습니다. 비어 있지 않기 때문에 건너뛰고 , 하지만 이것은 실제로 잘못된 것이죠? 왜냐하면 이렇게 하면 거리 필드가 머리가 없는 고양이를 나타내게 되기 때문입니다. 그리고 그것은 분명히 우리가 원하는 것이 아닙니다. 그렇다면 이 문제를 어떻게 해결할까요? 전처리 단계를 추가해야 합니다.
And the first very important optimization is to make a differentiation between static geometry and dynamic geometry. Because static geometry does need to be voxelized each frame, right? Because, I mean, It doesn’t change. And it would be a waste of computation if you would voxelize it each frame. So the optimization is to not do this. So there’s a way for Brixelizer to cache the results and just keep it persistent. To achieve this, Brixelizer only creates new Bricks for voxels that do not point to any Brick yet. So it the voxel already points to a Brick, this voxel will be completely ignored throughout the whole voxelization and emit distance field pipe-line. So How does this work in practice? So, In the beginning, We have a completely empty grid. And then We have some geometry that we want to process. Since the grid is completely empty, All voxels will be considered. So We just go on as descrived previously, We just check which voxels the geometry intersect with and then We create Bricks for these voxels. Now, If at some point, new geometry comes in, So, We have the dog and now We also have the turtle. But When doing this check, Brixelizer will notice, Okay, the dog only intersects with voxels that already point to Brick. It will just leave them as they are, While the turtle will intersect with empty voxels. So for them, It will generate new Bricks and generate the distance field. So, this is fine until you get a new geometry that intersects with voxels that already point to a Bricks. So, We have the cat and We do the voxelization process again. So, We checked which voxels do the dog intersect, Which voxels do the cat intersect, Which voxels do the turtle intersect and we’ll find out, okay, the cat intersects with six voxels, four of them are empty, fine. But two of them are actually not empty. I marked them here as red voxels. And since they’re not empty, they will be skipped , but this is actually wrong right? Because this way, our distance field will represent a cat without a head. And that’s clearly not what we want. So How do We solve this? We need to add a pre-processing step.
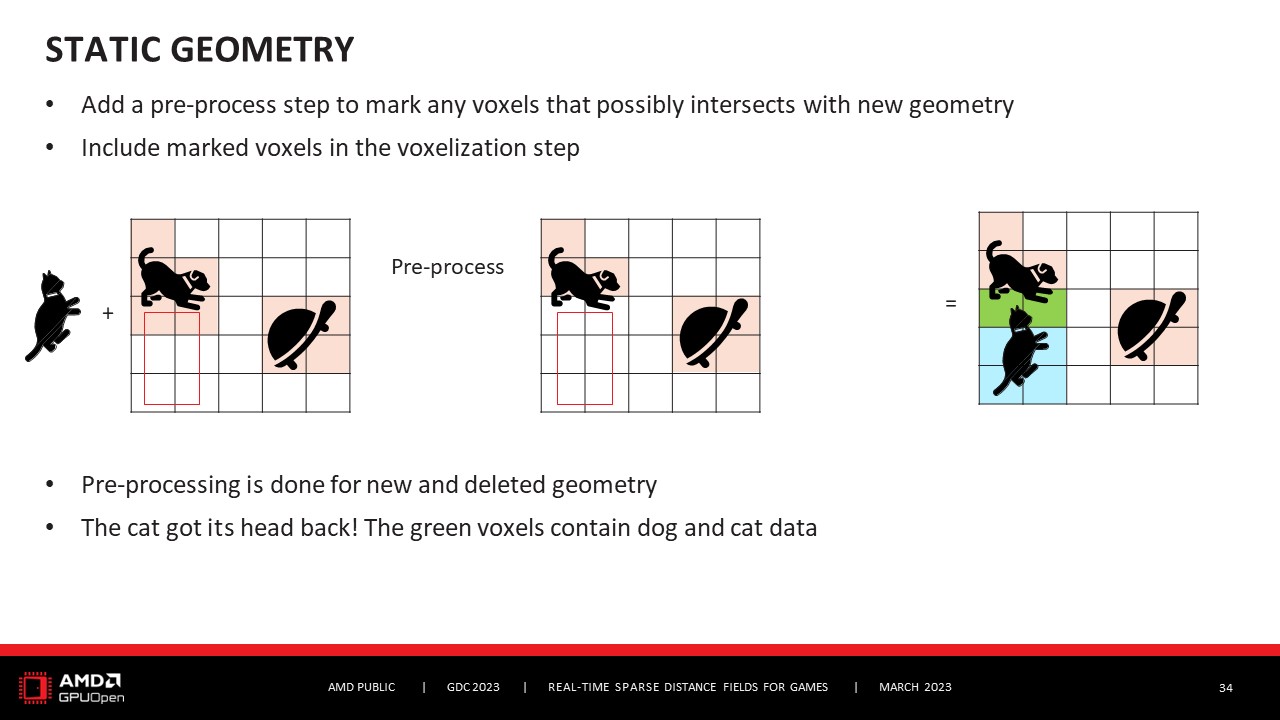
이 전처리 단계에서는 새 지오메트리와 교차할 가능성이 있는 복셀을 결정합니다. 이 경우에는 고양이입니다. 그리고 이 복셀을 표시합니다. 마크는 복셀을 해제한다는 의미입니다. 일단 복셀이 해제되면 복셀화 단계에서 다시 고려할 것이기 때문입니다. 따라서 고양이와 교차할 복셀을 확인하고 자유로 표시한 다음 복셀화를 할 때 일반적인 작업을 수행합니다. 따라서 이전에는 빨간색으로 표시된 복셀이 이제 녹색으로 표시됩니다. 새로운 Brick이 생성되기 때문입니다. 이제 이 새로운 Brick에 대한 거리 필드를 생성할 때 고양이 정보도 고려하지만 여전히 개 정보도 고려합니다. 따라서 거리 필드는 머리가 있는 고양이와 다리가 있는 개를 올바르게 표현할 것입니다. 모든 것이 정상입니다. 이제 문제는 이 지오메트리가 교차할 가능성이 있는 복셀을 어떻게 결정할 것인가입니다.
In this pre-processing step, We determine which voxels might possibly intersect the new geometry. So in this case, the cat. And these voxles will be marked. Mark means We just free them, Because once they are free, they will be reconsidered during the voxelization step. So We check which voxels will intersect the cat, We mark them as free, and then when We do the voxelization, We do the usual job. So the formerly red marked voxels are here now marked green, Because they get new Bricks created. And now When we generate the distance field for these new Bricks, We will take into account the cat information, But also still the dog information. So the distance field will correctly represent a cat with a head and also a dog with legs. Everything is fine. Now the question is how do We determine the voxels this geometry possibly intersects with?
따라서 지오메트리의 AABB를 복셀 크기 단위로 스케일링합니다. 그리고 삼각형의 경우 이 삼각형이 복셀과 교차할 수 있는 최대 개수를 구합니다. 이제 지오메트리를 사용하면 가능한 최대 복셀과 지오메트리 교차점 수를 알 수 있습니다. 삼각형 부분에 대해 이 참조가 유효한지 확인했습니다. 이 경우에는 이러한 지오메트리 참조에 대해 검증하지 않고 모두 지웁니다. 지오메트리와 실제로 교차하지 않는 복셀을 지우지 않으면 검증하는 데 드는 시간이 더 많이 들기 때문입니다. 그래서 이 방법은 그냥 지운 다음 업데이트 중에 복셀화를 다시 고려하는 것입니다.
So We take the AABB of the geometry and We scale it to voxel size unit. And for the triangles this gave us the maximum number of possible intersections this triangle had with the voxels. Now with the geometry this gives us the maximum number of possible voxel and geometry intersections. For the triangle part we did verify if this reference was valid. For this case, So for these geometry references, We just don't verity, We just clear all of them. Becase verifying would be more expensive than the time it would win by not clearing voxels that actually don't intersect the geometry. So, This way We just clear them and then they will be reconsidered for voxelization during the update.
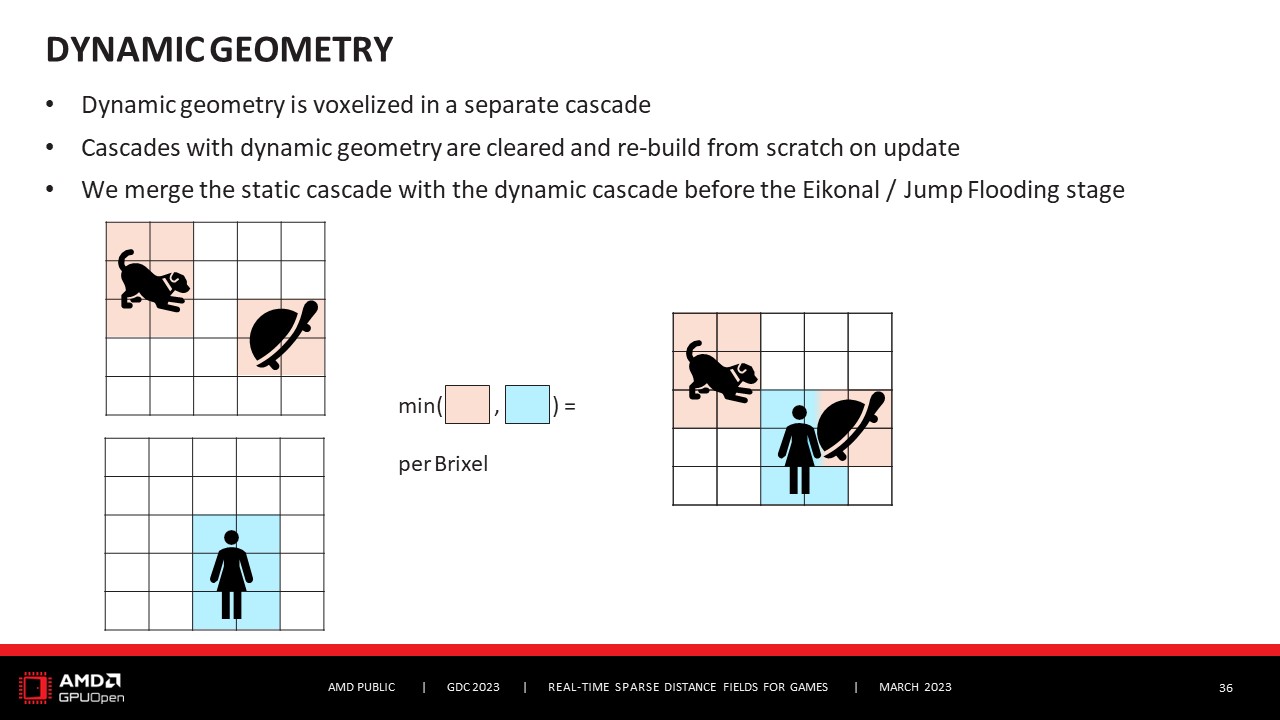
이것은 정적 지오메트리였습니다. 브릭셀라이저는 동적 지오메트리를 어떻게 처리하나요? 동적 지오메트리는 매 프레임마다 다시 처리해야 합니다. 매 프레임마다 업데이트하면 매 프레임마다 달라집니다. 네, 그래서 매 업데이트마다 동적 지오메트리가 변경되었기 때문에 다시 처리해야 합니다. 즉, 기본적으로 동적 지오메트리를 위해 모든 것을 처음부터 다시 빌드해야 한다는 뜻입니다. 이를 지원하기 위해 브릭셀라이저에는 실제로 두 개의 별도 캐스케이드가 있습니다. 하나는 정적 지오메트리용, 다른 하나는 동적 지오메트리용입니다. 그리고 동적 지오메트리용은 각 업데이트가 시작될 때 완전히 지워집니다. 그런 다음 업데이트 시 모든 것을 처음부터 다시 빌드합니다. 어느 시점에서 정적 캐스케이드와 동적 캐스케이드를 병합하여 실제로 두 정보가 모두 포함된 거리 필드를 만들어야 합니다. 그리고 병합은 Eikonal/Jump 플러딩 단계 전에 이루어지며, 브릭셀 단위로 이루어집니다. 따라서 모든 삼각형 픽셀 정보를 확인하여 브릭을 채우는 것처럼 일종의 내장된 단계로 디스턴스 필드를 방출할 때 정적 및 동적 캐스케이드 모두에 대해 이 작업을 별도로 수행합니다. 그런 다음 병합을 수행한 다음 병합된 캐스케이드를 기반으로 Eikonal 을 수행하여 아직 정보가 없는 나머지 브릭셀에 값을 전파합니다. AABB 트리도 병합된 캐스케이드를 기반으로 합니다.
So, This was static geometry. How does Brixelizer deal with dynamic geometry? So dynamic geometry needs to be reprocessed every frame, Well in every update, every frame depends if you call update every frame. But yeah, So in every update We need to reprocess the dynamic geometry becase they have changed. Which basically means that We just rebuild everything grom scratch for dynamic geomerty. In order to support this, Brixelizer actually has two separate cascades. One for static geometry, One for dynamic geometry. And the one for dynamic geometry is completely cleared at the beginning of each update. And then it will just rebuild everything from scratch on update. At some point We have to merge the static cascade with the dynamic cascade so that We actually have a distance field that has both information in it. And the merge happens before the Eikonal/Jump flooding stage.And it's per Brixel. So When We emit the distance field to the step that We kind of built in, like filling out the Brick by checking all the triangle pixel information, We do this separately for both the static and dynamic cascades. Then We do the merge, and then We do the Eikonal based on the merged cascade to propagate the values to the remaining Brixels that don't have any information yet. The AABB tree is also based on the merged cascade.
별첨: Eikonal 방정식의 적용 분야:
광선 추적: 렌즈나 거울을 통과하는 빛의 경로를 계산하는 데 사용됩니다.컴퓨터 그래픽: 물체의 그림자와 반사 효과를 계산하는 데 사용됩니다.초음파 영상: 초음파 파동의 전파를 모델링하는 데 사용됩니다.
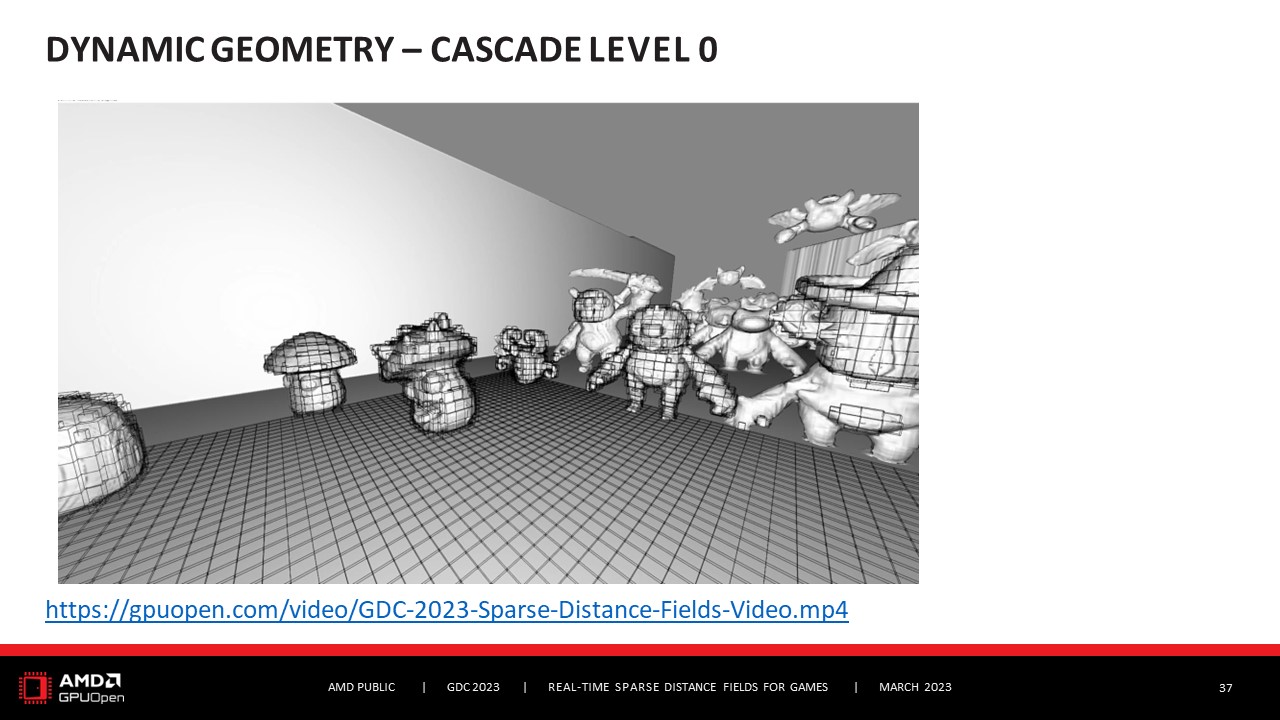
AABB 트리도 병합된 캐스케이드를 기반으로 합니다. 이 데모 동영상은 Brixelizer가 동적 지오메트리를 지원한다는 것을 보여주기 위한 것입니다. 지오메트리와 교차하는 복셀이 어떻게 업데이트되고 새로운 거리 필드가 런타임에 생성되는지 확인할 수 있습니다. 지금까지 정적 지오메트리와 동적 지오메트리에 대해 설명했습니다.
The AABB tree is also based on the merged cascade. And this is just a little demo video to demonstrate to you that Brixelizer does support dynamic geometry. So here you can see how the voxels that intersect with geometry update and the new distance field just gets generated in run-time. Yeah, That was all about static and dynamic geometry.
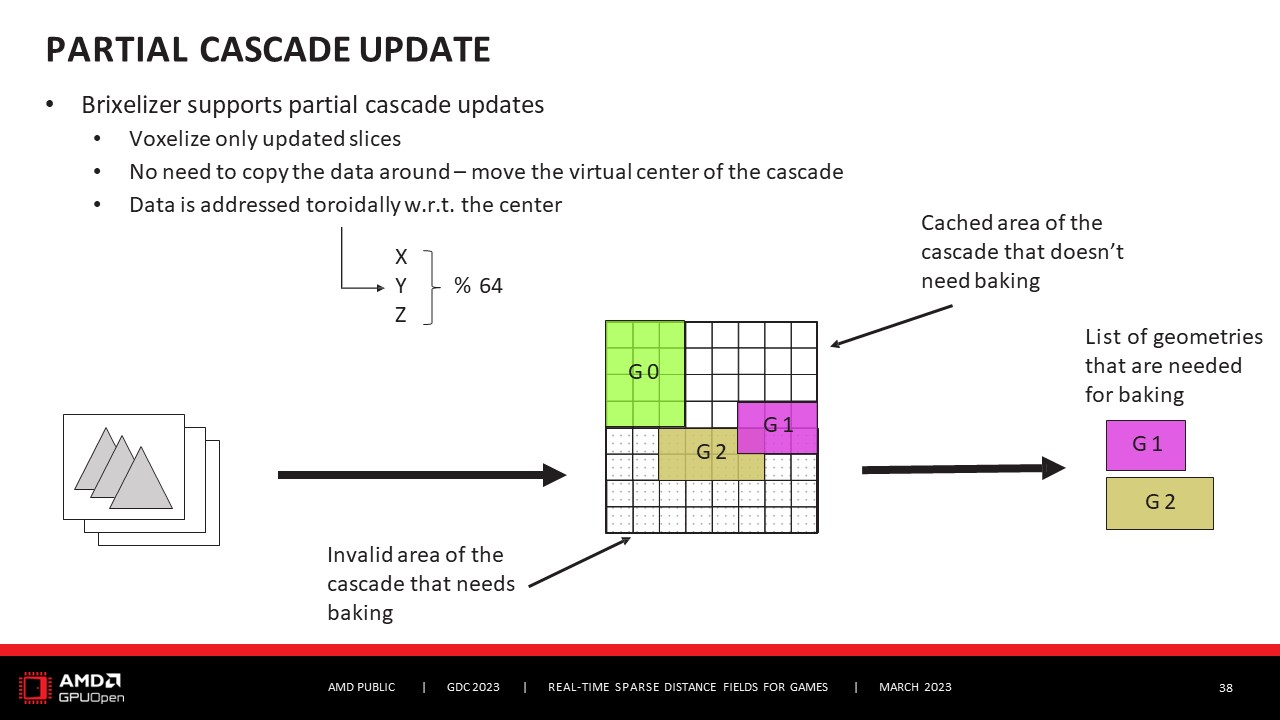
이제 캐스케이드 업데이트와 이를 호출하는 방법에 대해 설명합니다. 이미 말했듯이 업데이트는 하나의 캐스케이드에 대한 것입니다. 실제로 부분적인 캐스케이드 업데이트만 수행할 수도 있습니다. 예를 들어 카메라가 움직이면 캐스케이드의 일부가 여전히 유효하지 않을 수 있습니다. 하지만 캐스케이드의 다른 부분은 이전에 처리하지 않은 영역을 나타내기 때문에 업데이트가 필요합니다. 이 작업은 캐스케이드의 중심을 가상으로 이동하는 것만으로 이루어지므로 데이터를 복사할 필요가 없으며, 데이터는 중심을 기준으로 토로이드 방식으로 처리됩니다. 따라서 이것은 처리 속도를 높이는 한 가지 방법이며, 실제로 필요한 것만 업데이트합니다.
And now about the cascade updates and how to call it. As I already said, an update is for one cascade. And actually, you can even only do a partial cascade update. So for example, if your camera moves, a part of the cascade might still be vaild. But another part of cascade needs to be update because it just represents a region that We haven't processed before. And this is done by just moving virtually the center of the cascade, So you don't need to copy any data around, and the data is addressed toroidally with respect to the center. So this is one way to speed up the processing, that We just update what's really needed.
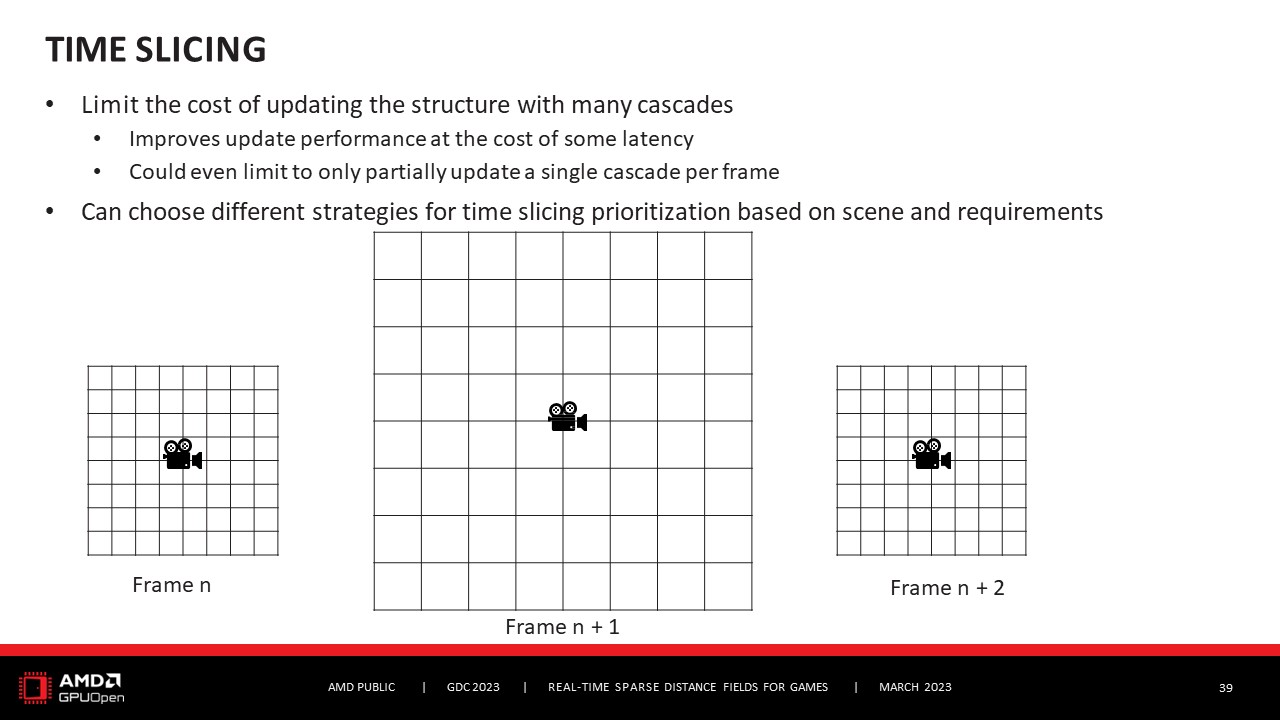
성능을 개선하는 또 다른 방법은 타임 슬라이싱입니다. 어차피 각 캐스케이드에 대해 개별적으로 업데이트를 호출해야 하므로 이러한 업데이트를 호출하는 방법을 결정할 수도 있습니다. 물론 업데이트 성능과 약간의 지연 시간 비용 사이의 절충안이기도 합니다. 매 프레임마다 모든 캐스케이드를 업데이트할 수도 있습니다. 프레임당 하나의 캐스케이드만 업데이트하거나 프레임당 절반의 캐스케이드만 업데이트할 수도 있습니다. 가장 좋은 전략은 무엇인가요? 장면과 요구 사항에 따라 다르지만 다양한 전략을 선택할 수 있습니다. Brixelizer는 한 가지 전략을 제안합니다. 첫 번째 캐스케이드는 짝수 프레임마다 업데이트하고 다른 캐스케이드는 홀수 프레임마다 업데이트하는 것입니다. 이는 첫 번째 캐스케이드가 카메라에 가장 가까운 영역을 억제하기 때문에 가장 중요한 캐스케이드라고 생각하기 때문입니다. 그리고 캐스케이드가 멀어질수록 업데이트되는 빈도는 줄어듭니다. 하지만 이것은 사용할 수 있지만 사용할 필요는 없는 Brixelizer의 제안일 뿐입니다.
Another way to improve the performance is time slicing. So, As We need to call an update for each cascade separatrly anyway, We can also decide how We call these updates. And of course, It's also a trade-off between update performance and the cost of some latency. I mean You can update all cascades each frame. You can also just update one cascade per frame or just half a cascade per frame. What's the best strategy? It really depends on your scene and also on your requirements but yeah, It is possible to choose differenct strategies.Brixelizer will propose one strategy. This is to update the first cascade every even frame and the others every odd. This is because it's considered that the first cascade is the most important one because it repressents the areas closest to the camera. And then the further away the cascade gets, the less often it gets updated. But this is just a proposal of Brixelizer that can be used but doesn't need to be used.
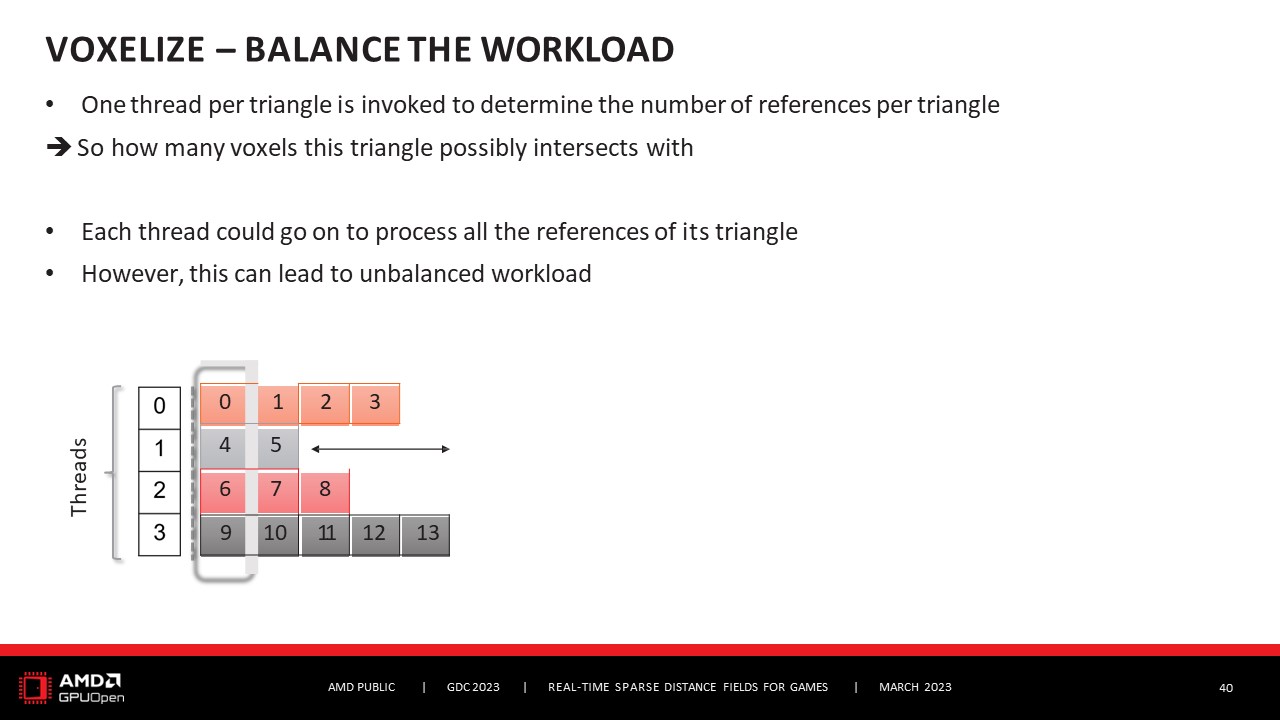
복셀화 파이프라인 자체에는 실제로 워크로드가 약간 불균형한 두 단계가 있습니다. 그리고 최적화는 이를 재조정하는 것입니다. 하나는 트라이앵글 참조를 처리할 때입니다. 그래서 삼각형당 하나의 스레드를 생성합니다. 먼저 지오메트리의 모든 삼각형을 세죠? 그런 다음 삼각형당 하나의 스레드를 생성합니다. 그리고 각 스레드가 참조 수를 결정했습니다. 따라서 이 삼각형이 복셀과 교차할 수 있는 최대 수를 계산했습니다. 그런 다음 참조가 유효한지 여부를 확인해야 했습니다. 따라서 각 스레드가 해당 삼각형을 계속 유지하면서 이 삼각형의 모든 참조를 처리하고 유효한지 여부를 확인하도록 할 수 있습니다. 하지만 네, 이렇게 하면 일부 삼각형은 교차할 수 있는 벡셀이 많기 때문에 워크로드가 상당히 불균형해질 수 있습니다. 그리고 다른 삼각형에는 아주 적은 수의 벡셀만 있을 수도 있습니다.
Then during the voxelization pipeline itself, there are two steps which acually have a bit of unbalanced workloads. And the optimization is to rebalance it. And one is When We process the triangle references. So,We spawn one thread per triangle. So first We counted all the triagnles of the geomety, right? And then We spawn one thread per triangle. And each thread determined the number of references. So the maximum number this triangle possibly intersects with voxels. And then We had to verify if the reference was valid or not. So We could let each thread go on to stick with its triangle and to just process all the references of this triangle and to verify if they're valid or not. But Yes, this can lead to quite unbalanced workloads because some triangles will have a lot of vexels they might possibly intersect with. And other triangles might have just a very few.
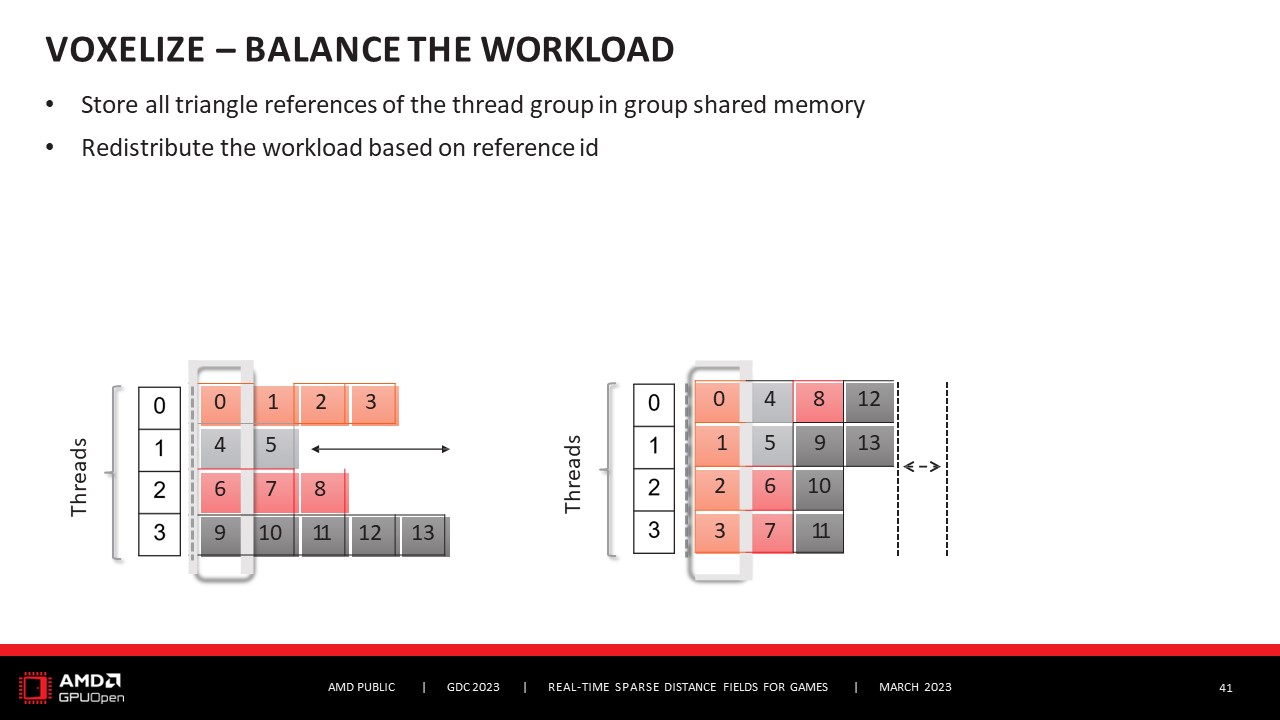
따라서 각 스레드가 자신의 트라이앵글을 고수하도록 하는 대신 모든 참조를 그룹 공유 메모리에 저장합니다. 그런 다음 모든 참조가 그룹 공유 메모리에 저장되면 스레드가 삼각형을 버리고 그룹 공유 메모리에서 참조 ID에 따라 참조를 선택하도록 합니다. 어느 트라이앵글에 속해 있는지는 신경 쓰지 않습니다. 이렇게 하면 전체 스레드 그룹의 모든 참조와 마찬가지로 참조가 사용 가능한 모든 스레드에 배포됩니다.
So, Instead of just letting each thread stick to their triangles, We sotre all the references to group shared memory. And then once all the references are stored in group shared memory, We let the thread abandon the triangle and just pick a reference based on the reference ID from the group shared memory. They just don't care to which triangle it belongs to. And in this way, the references, Like all the references from the whole thread group gets distributed to all the available threads.
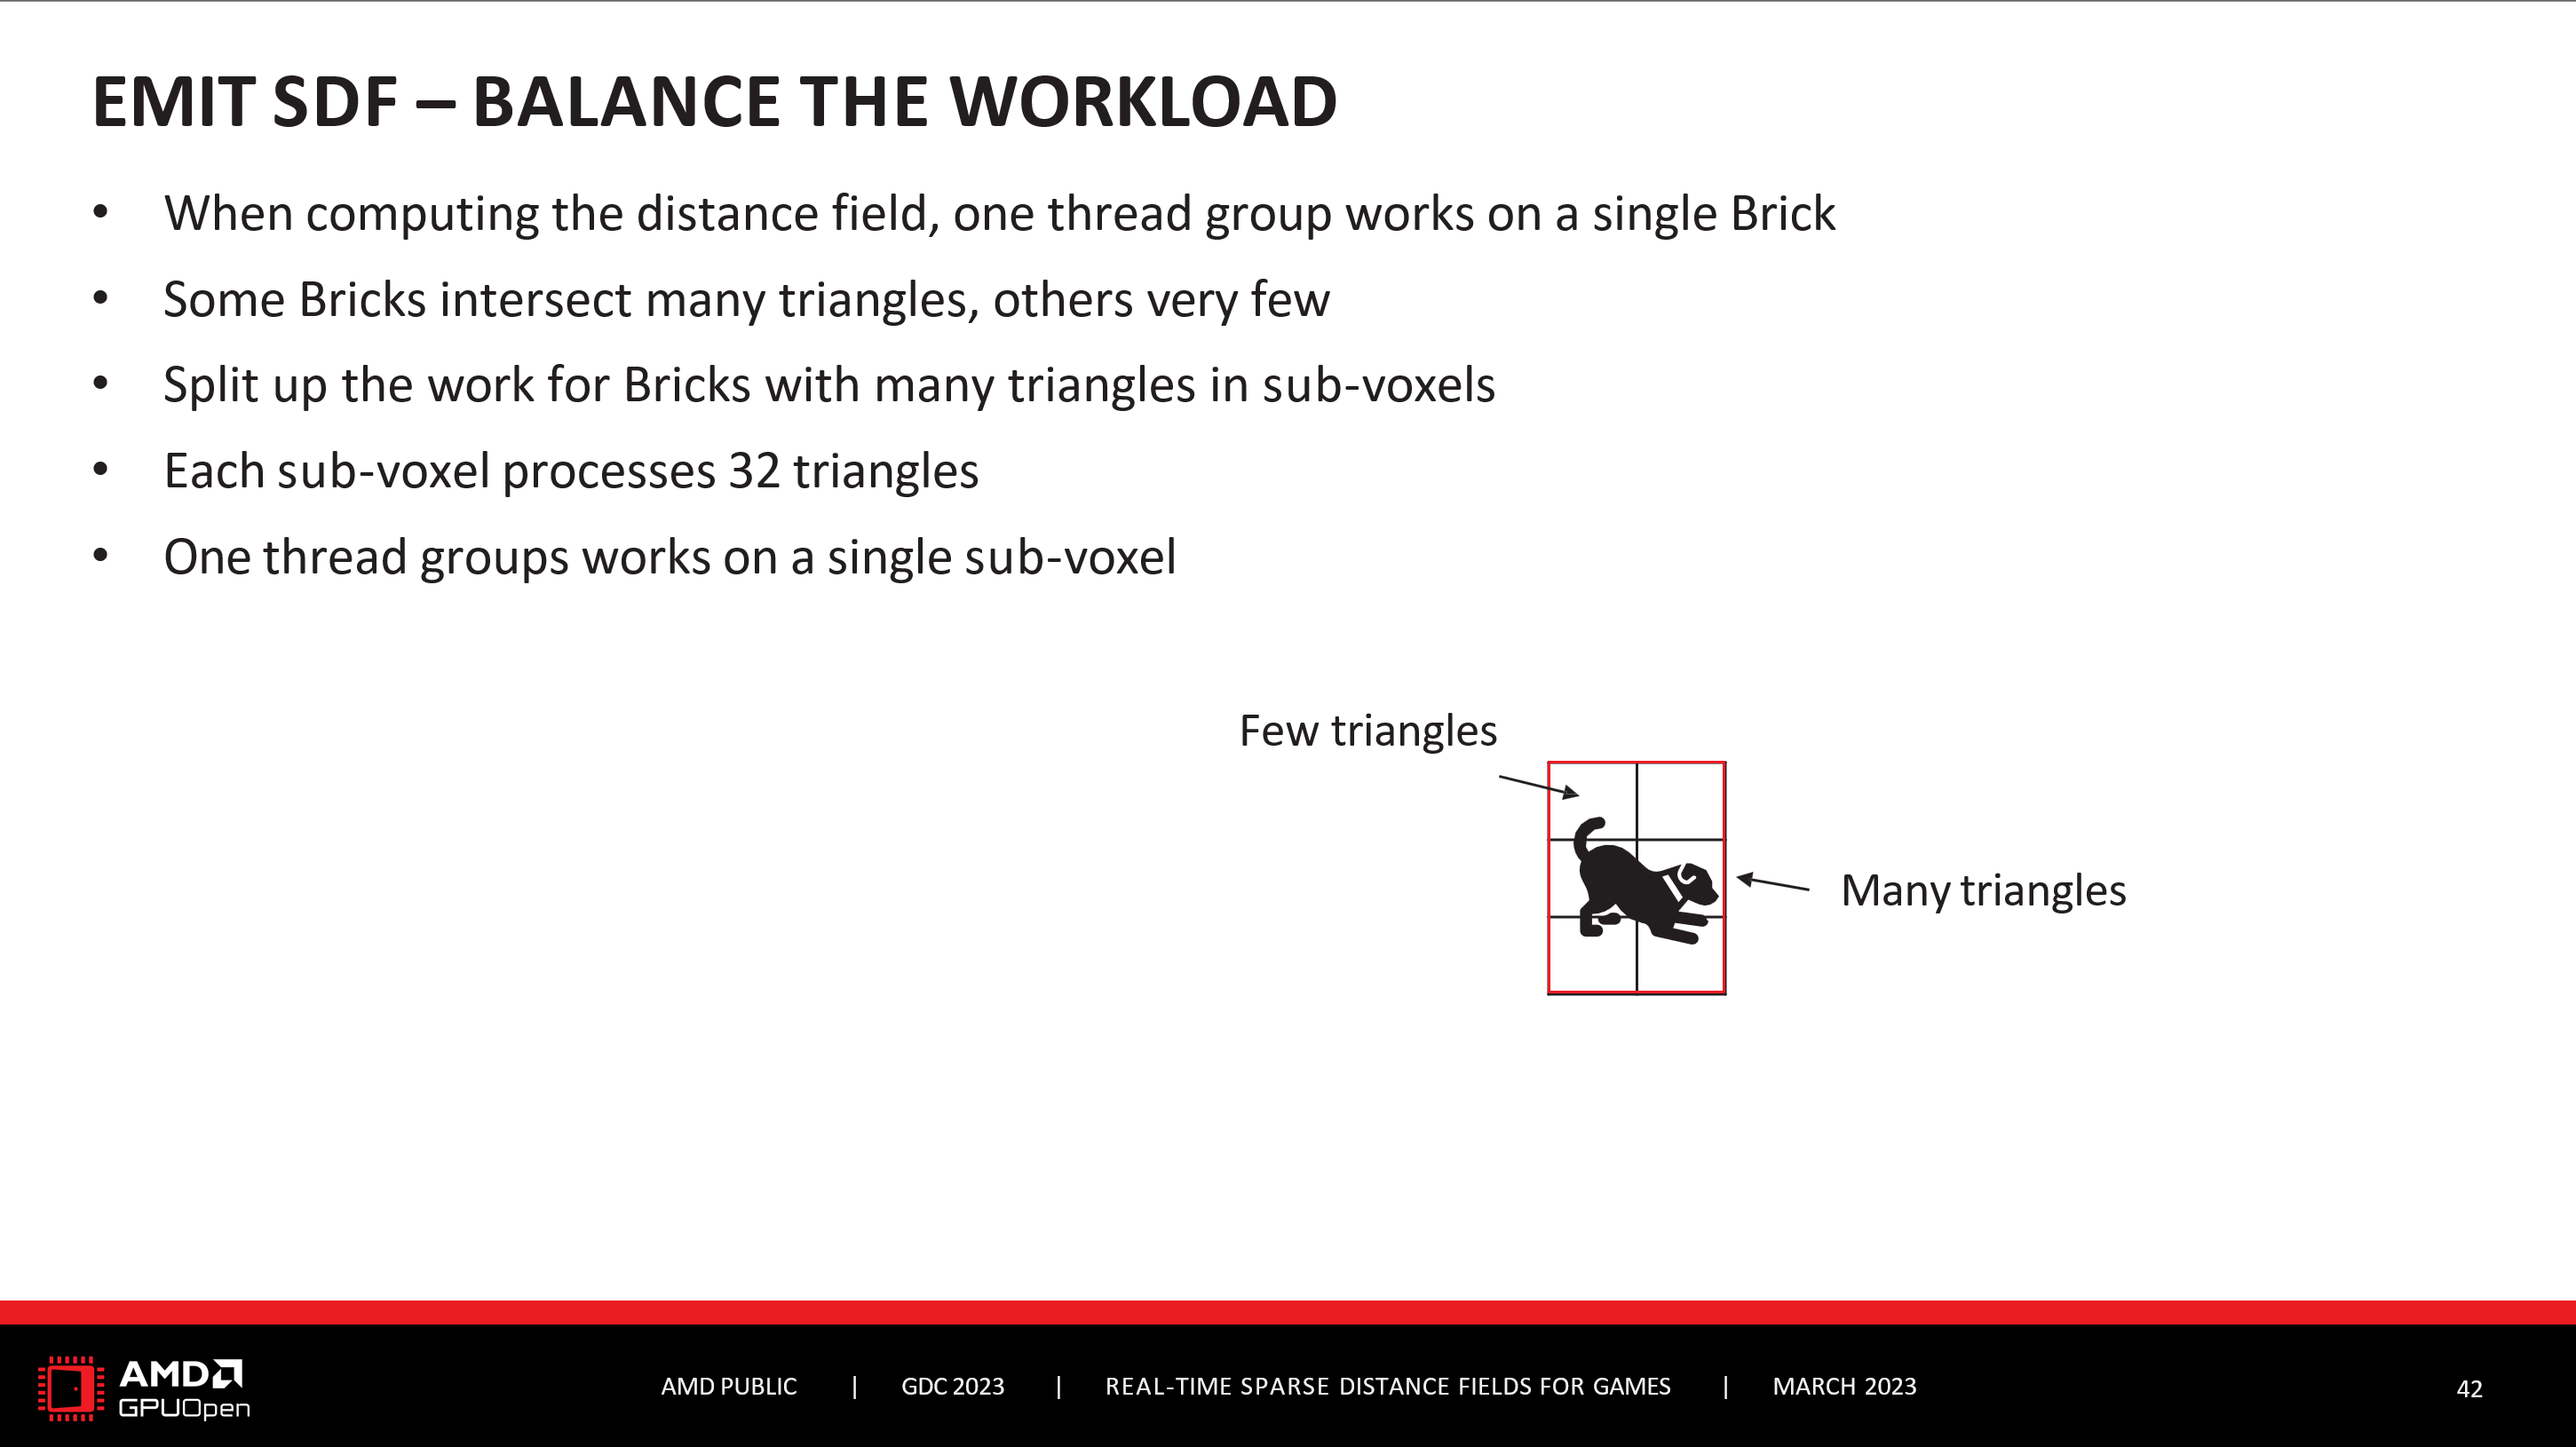
브릭의 거리 필드를 계산할 때 또 다른 워크로드 밸런싱이 이루어집니다. 따라서 하나의 스레드 그룹이 하나의 브릭에서 작동합니다. 하지만 이제 어떤 브릭은 많은 삼각형과 교차하고, 어떤 브릭은 아주 적은 삼각형과 교차합니다. 그리고 작업량의 균형을 맞추기 위해 삼각형이 많은 브릭에 대해 실제로 작업을 분할합니다. 그리고 소위 서브 복셀로 분할됩니다.
Another workload balancing is done when We compute the distance field for the Bricks. So one thread group works on a single Brick. But now some Bricks intersect with many triangles, Others with very few. And to balance the workload a bit better, the work is actually split up for Bricks with many triangles. And it's split up in so-called sub-voxels. And each sub-voxel processes 32 trianles and one thread group works on a single sub-voxel. So basically for every 32 triangles that a brick intersects with, We spawn a new thread group.
삼각형에 대해 이야기하자면, 브릭셀라이저는 작은 삼각형은 작지 않은 삼각형과 다르게 처리합니다.
삼각형과 다르게 처리합니다. 이는 메모리를 절약하고 처리 속도를 높이기 위한 것입니다. 그리고 특정 지점에서 삼각형이 너무 작아서 브릭의 해상도 때문에 더 정확하게 볼 수 없기 때문에 안전하게 이렇게 할 수 있습니다. 이는 또한 삼각형이 작다고 말하는 것이 브릭에 따라 달라진다는 것을 의미합니다. 따라서 브릭은 삼각형이 10분의 1보다 작으면 작은 것으로 간주합니다.
브릭의 10분의 1보다 작으면 작은 것으로 간주합니다. 따라서 실제 임계값은 브릭에 따라 달라지고
이 브릭이 어떤 캐스케이드에 있는지, 이 캐스케이드의 해상도가 얼마인지에 따라 달라집니다.
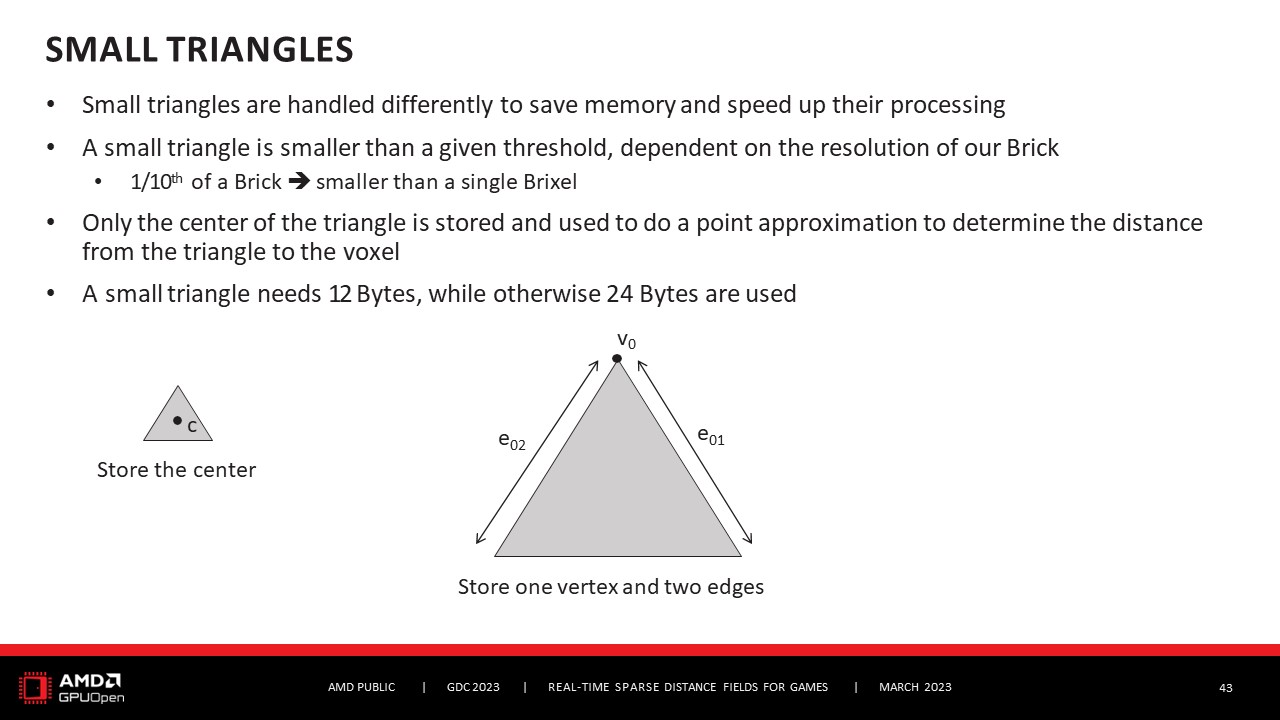
작은 삼각형의 경우 작은 삼각형의 경우 삼각형의 중심만 저장한 다음 이 중심을 사용하여 점 근사치를 수행하여 삼각형에서 복셀까지의 거리를 결정합니다.
복셀, 브릭셀까지 삼각형 교차 테스트를 수행해야 할 때마다 이 점을 사용하여 거리를 결정합니다.
이렇게 하면 작은 삼각형의 경우 12바이트만 필요하지만, 그렇지 않은 경우 일반적으로 하나의 꼭지점과 두 개의 가장자리를 저장하기 때문에 24바이트가 필요합니다.
Talking about triangles, Brixelizer handles small triangles differently than not small
triangles. And this is done to save memory and also speed up the processing. And we can safely do this because at a certain point a triangle is so small that being more accurate you wouldn't be able to see it because of the resolution of the Brick. This also means that to say a triangle is small or not depends on the Brick. So Brixelizer will consider a triangle to be small if it's smaller than one-tenth of a
Brick, which means it's smaller than a single Brixel. So what this in real terms is, the actual threshold depends on the Bricks and it depends
in which cascade this Brick is, what the resolution of this cascade is.
In a small triangle, for a small triangle we only store the center of the triangle and then this center is used to do a point approximation to determine the distance from the triangle
to the voxel, to the Brixel, wherever we need to do this triangle intersection test.
This way we also only need 12 bytes for a small triangle, whereas otherwise we need 24 bytes because usually we store one vertex and two edges.
그런 다음 프로세스 중에 몇 가지 상한선이 있습니다. 따라서 프레임당 처리되는 레퍼런스 수에 제한이 있습니다. 이 제한은 변경할 수 있으므로 장면과 성능 요구 사항에 따라 달라집니다.
요구 사항에 따라 달라질 수 있으며 처리 시간이 갑자기 폭발적으로 증가하는 것을 방지하기 위한 것입니다.
따라서 레퍼런스가 더 많으면 다음 프레임에서 처리하도록
나중에 프레임으로 설정할 수 있습니다.
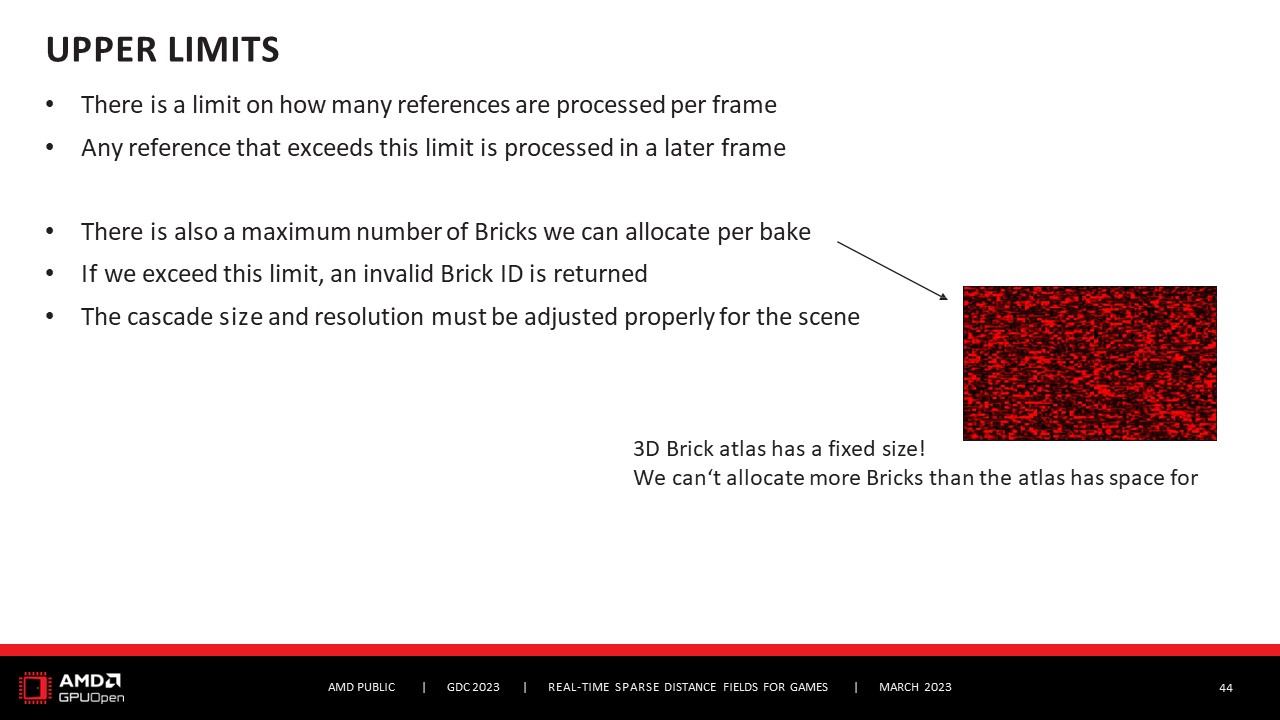
그리고 베이크당 할당할 수 있는 최대 브릭 수도 있습니다. 이 제한을 초과하면 잘못된 브릭 ID가 반환됩니다.
따라서 현재 3D 브릭 아틀라스에는 크기가 고정되어 있으므로
보다 더 많은 브릭을 할당할 수 없으며 현재 아틀라스에는 256,000개의 브릭을 위한 공간이 있습니다. 더 많은 브릭을 할당해야 한다면 실제로 캐스케이드를 조정해야 합니다. 따라서 캐스케이드의 크기와 해상도를 변경해야 하며, 장면에 따라 적절한 크기가 달라질 수 있습니다.
Then we have some upper limits during the process. So there is a limit on how many references are processed per frame. This limit can be changed, so it kind of depends also on the scene and also on the performance
requirements and it's there to prevent the processing time to suddenly explode.
So there's a limit you can set, okay, if we have more references we just will do it in
a later frame.
And then there's also a maximum number of Bricks we can allocate per bake. If we exceed this limit then an invalid Brick ID is returned.
So currently the 3D Brick atlas has a fixed size, so we can't allocate more Bricks than
this atlas is sized for and the current size has space for 256,000 Bricks. If we need to allocate more Bricks, then actually the cascade has to be tuned. So you have to change the size of the cascade, maybe also the resolution and what's appropriate really depends on the scene.

따라서 성능, 즉 브릭셀라이저가 런타임에 이 모든 처리를 수행할 수 있도록 실시간 영역에 적용하기 위해 모든 최적화를 수행했습니다. 성능은 다양한 요소의 영향을 받기 때문에 매우 다양한 수준에서 조정할 수 있고 장면에 따라 달라지기 때문에 딱딱한 수치를 제시하기는 매우 어렵습니다. 기본적으로 프로세스에서 시간은 얼마나 많은 복셀을 터치하느냐에 따라 달라집니다.
또한 얼마나 많은 트라이앵글을 처리한 다음 궁극적으로 얼마나 많은 브릭을 만들어야 하는지에 따라 달라집니다. 이 세 가지 엔티티는 모두 어느 정도 중복되는 영향을 미치지만 완전히 겹치지는 않습니다. 따라서 서로 다른 부분에 영향을 미치기도 하지만 때로는 같은 부분에 영향을 미치기도 합니다. 그렇지만 네, 이 세 가지 엔티티 모두 우리가 원하는 성과를 내기 위해 계속 주시해야 할 중요한 요소입니다. 그리고 상태 추적 및 정리와 관련된 약간의 오버헤드도 있습니다. 그리고 새로운 지오메트리가 없기 때문에 결국 아무것도 업데이트하지 않더라도 모든 상태 업데이트에 필요하므로 기본적으로 정적 씬에서 업데이트하고 아무것도 변경되지 않습니다. 여전히 이런 종류의 일반적인 상태 추적 정리 작업이지만 오버헤드는 매우 적습니다. 따라서 성능에 상당한 영향을 미칠 수 있으므로 파라미터를 적절히 조정하는 것이 매우 중요합니다. 하지만 예, 일반적으로 예비 결과는 향후 변경될 수 있으므로 Brixelizer의 출시 전 버전을 기반으로 한 것이며, 현재도 최적화를 진행 중입니다. 이러한 예비 결과에 따르면 수천 개, 수십만 개의 엔티티를 처리하는 데 걸리는 시간은 일반적으로 밀리초 미만으로 유지되는 것으로 나타났습니다. 여기에는 파이프라인 중에 여러 단계가 포함될 수 있습니다. 하지만 이 역시 이 엔티티가 어떤 종류의 속성인지, 즉 삼각형의 개수, 삼각형의 크기 등에 따라 달라집니다. 이러한 엔티티가 수백만 개로 늘어나면 처리 시간도 몇 밀리초가 걸릴 수 있습니다. 물론 엔티티의 수가 너무 많으면 처리 시간도 엄청나게 늘어날 수 있습니다. 하지만 주의만 한다면 처리 단계를 밀리초 미만으로 유지하는 것은 분명히 가능합니다. 그리고 네, 테스트 시스템에는 RX 7900 XTX가 있었고 2월의 드라이버를 사용했기 때문에 23.2.1 드라이버를 사용했습니다. 그리고 말씀드렸듯이 아직 출시 전 버전의 브릭셀라이저를 기반으로 하고 있고 최적화를 계속 진행 중이므로 수치는 변경될 수 있습니다.
So performance, I mean we did all these optimizations to get Brixelizer into the real-time sphere so that it can do all this processing at runtime. Performance is influenced by a lot of different factors, so it's very difficult to give hard numbers because you can tune it on so many different levels and it's so scene dependent. Basically during the process, the time depends on how many voxels are touched.
It also depends on how many triangles are processed and then ultimately how many Bricks need to be made. All of these three entities, they also have somewhat overlapping influence, but not entirely. So they do influence different parts, but then also sometimes the same parts, if that makes any sense. But yeah, so all three entities of them are kind of important to keep an eye on, to make sure that the performance is where we want it to be. And then there's also a small overhead involved in state tracking and clean-up. And it's needed for every state update, even if you don't update anything in the end because there's just no new geometry, so it's just basically update on a static scene and nothing has changed. It's still this kind of general state tracking clean-up, but it's a really small overhead. And yeah, so it's really important to tune the parameters accordingly because they can affect the performance substantially. But yeah, in general on our preliminary results, so they might change in the future, they are based on a pre-release version of Brixelizer, we're still doing optimizations as I speak. These preliminary results, they showed that as long as you stay in the thousands, so several hundreds of thousands for any of these entities, you generally also stay under a millisecond that it takes to process this entity. This can involve several steps during the pipeline. But again, it also depends on what kind of property this entity is, so how many triangles, how large are the triangles, and so on. If you go for any of these entities into the millions, then also processing time can take a few milliseconds. And of course, if you go crazy on the number of entities, then the processing time can also go crazy. But yeah, it is definitely possible to do the process step to keep it under a millisecond if you are careful. And yeah, the test system had an RX 7900 XTX and it used the driver from February, so the 23.2.1 driver. And as I said, it's based on the pre-release version of Brixelizer and we're still doing optimizations, so the numbers are likely to change.
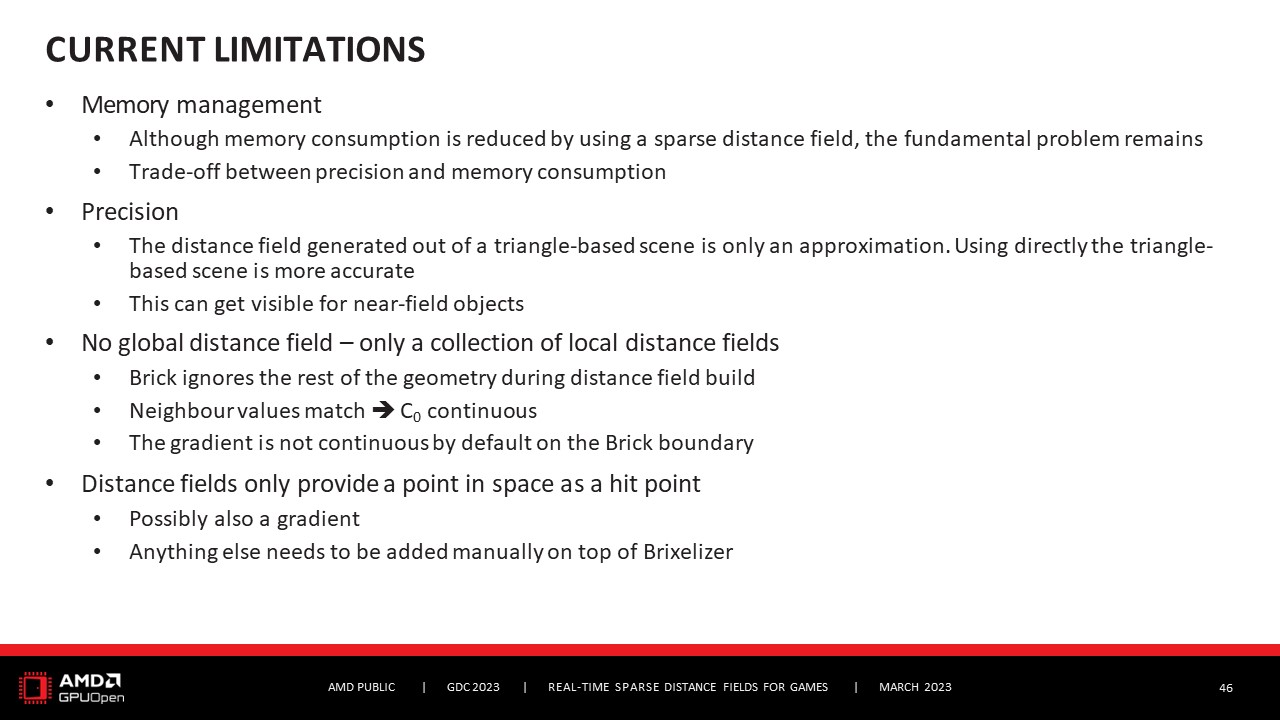
현재 제시된 프로젝트와 브릭셀라이저의 한계점. 첫 번째는 당연히 메모리 관리입니다. 브릭셀라이저는 희소 거리 필드를 사용하고 희소 거리 필드의 목적도 메모리를 절약하는 것이지만, 물론 근본적인 문제는 정밀도와 메모리 소비 사이에 항상 상충 관계가 존재한다는 점입니다. 브릭셀라이저는 삼각형 기반 장면의 근사치를 생성하기 때문에 정밀도가 다음 한계입니다. 따라서 정확도만 원하는 경우 트라이앵글 기반 씬을 직접 사용하면 됩니다. 하지만 브릭셀라이저는 이 근사치를 생성하고 이를 평가하는 데 매우 효율적입니다. 이것이 바로 브릭셀라이저의 목적입니다. 하지만 이 정밀도의 차이가 있기 때문에 브릭셀라이저는 근사치를 생성하기 때문에 근거리 물체에 대해 표시될 수 있습니다. 또한 브릭셀라이저는 전역 거리 필드를 생성하지 않고 로컬 거리 필드 모음만 생성합니다. C_0 연속성을 가지므로 이웃 값이 일치합니다. 그라디언트는 기본적으로 브릭 경계에서 연속적이지 않습니다. 또한 거리 필드는 공간의 한 지점만 히트 포인트로 제공합니다. 그라디언트도 얻을 수 있지만 앞서 말했듯이 C_1 연속이 아니라 C_0 연속일 뿐입니다. 하지만 그 외의 모든 것은 Brixelizer 위에 수동으로 추가해야 합니다. 따라서 브릭셀라이저는 이런 식으로 장면의 히트 포인트만 제공합니다.
Current limitations with the presented project, with Brixelizer. The first one is, of course, memory management. I mean, Brixelizer does use a sparse distance field and the purpose of a sparse distance field is also to save memory, but of course the fundamental problem remains, there's always a trade-off between precision and memory consumption. Then precision is the next limitation, because Brixelizer will generate an approximation of the triangle-based scene. So if accuracy is all you want, then just use the triangle-based scene directly. But Brixelizer generates this approximation that's then very efficient to evaluate. That's the purpose of Brixelizer. But yeah, this precision differences, so the fact that Brixelizer just generates an approximation, it can get visible for near-field objects. Also, Brixelizer does not generate a global distance field, it's only generating a collection of local distance fields. We do have C_0 continuity, so neighbor values match. Gradients, they are not continuous by default on the Brick boundary. Also, distance fields only provide a point in space as a hit point. Maybe we also get the gradient, but as I said, it's not C_1 continuous, it's just C_0 continuous. But yeah, anything else needs to be added manually on top of Brixelizer. So Brixelizer only gives you the hit point with the scene of this way.

하지만 이는 기본적으로 브릭셀라이저 자체에 대한 이야기입니다. 이제 문제는 Brixelizer를 게임 엔진에 통합하는 방법과 예상 작업량이 얼마인가 하는 것입니다.
But that's all about Brixelizer itself. Now the question is, how do we integrate Brixelizer into a game engine, and what's the estimated workload?
따라서 Brixelizer는 새로운 AMD FidelityFX SDK의 일부가 될 것입니다. 즉, 오픈 소스, 크로스 플랫폼은 물론 고도로 최적화될 것입니다. 모든 DX12 호환 GPU에서 실행되며, 라이브러리를 통해 제공되며, 사용자 지정 통합이 가능하도록 전체 C++ 및 HLSL 소스와 API 문서도 함께 제공됩니다.
So Brixelizer will be part of the new AMD FidelityFX SDK. This means it will be open source, cross-platform, and of course highly-optimized. It runs on any DX12-compatible GPU, it will be provided via a library, we will also provide the full C++ and HLSL source with an API documentation to enable custom integrations.
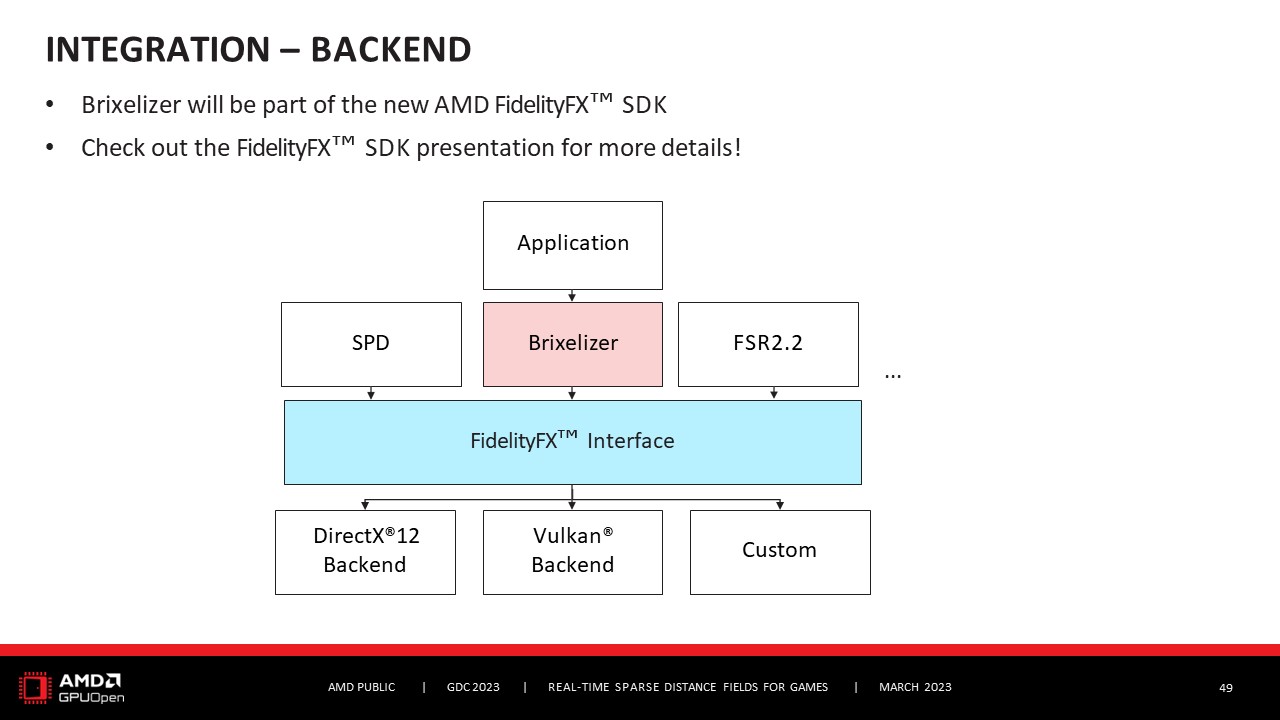
브릭셀라이저를 통합하는 방법을 시연하기 위해 DX12에서 제공되는 샘플도 있습니다. 브릭셀라이저는 새로운 AMD FidelityFX SDK의 일부가 될 것이므로 다른 모든 FidelityFX 효과도 사용하는 FidelityFX 인터페이스도 사용할 것입니다. 이 인터페이스에 대해 더 자세히 알고 싶으시다면, SDK 자체의 모든 FidelityFX 효과의 일반적인 구조에 대해 더 자세히 알고 싶으시다면 올해 GDC 프레젠테이션인 FidelityFX SDK 프레젠테이션을 확인해 보시기를 적극 추천합니다. 또한 참고용으로 GPUOpen에서 비디오로도 호스팅될 예정입니다.
There will also be a sample provided in DX12 to demonstrate how to integrate Brixelizer. Since it will be part of the new AMD FidelityFX SDK, it will also use the FidelityFX interface that every other FidelityFX effect is also using. If you want to know more about this interface, about the general structure of all the FidelityFX effects of the SDK itself, I highly recommend you to check out the FidelityFX SDK presentation, which is also a GDC presentation this year. And it will be also hosted as a video on GPUOpen for reference.
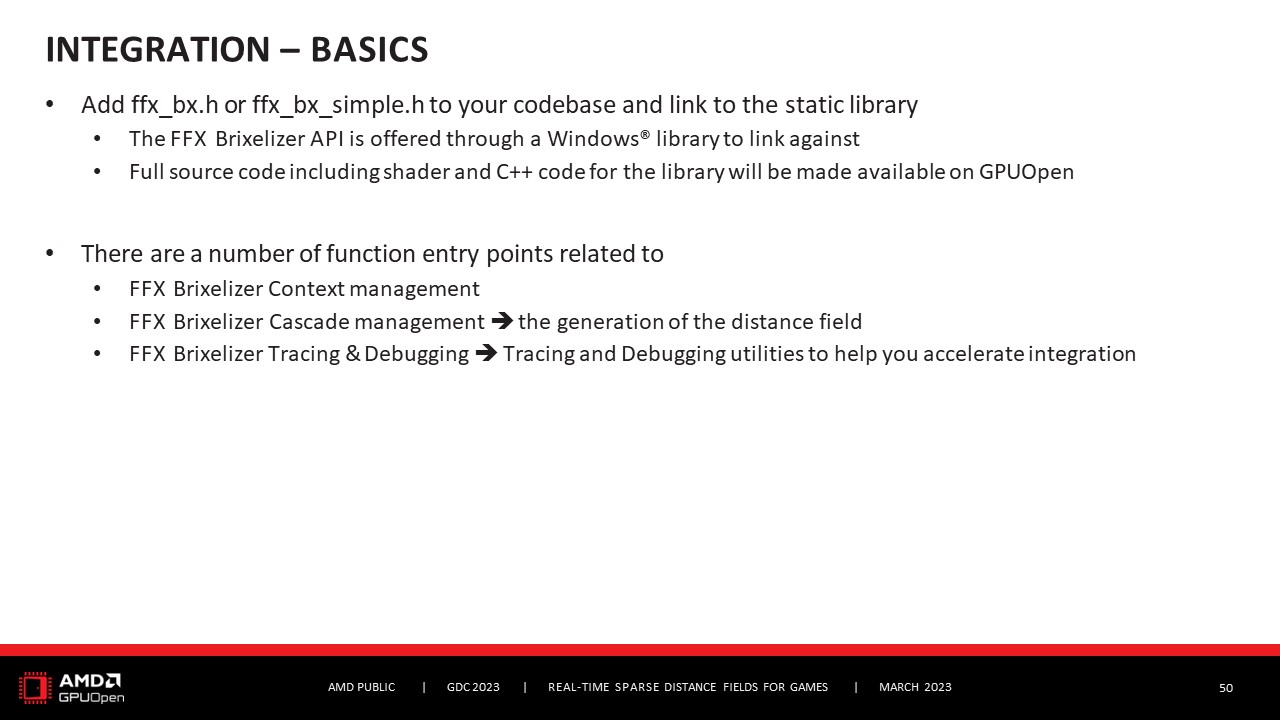
그렇다면 브릭셀라이저 자체를 통합하는 방법은 무엇일까요? 기본은 헤더 파일을 추가하는 것인데, 이는 모든 효과에 대해 동일하므로 Brixelizer의 경우 이 ffx_는 bx입니다. 브릭셀라이저에는 한 가지 특이한 점이 있는데, 두 가지 헤더 중에서 선택할 수 있습니다. 하나는 익숙한 ffx_bx이고 다른 하나는 간단한 버전입니다. 이는 Brixelizer가 두 가지 API 버전을 제공하기 때문입니다. 하나는 사소한 모든 것을 제어하고 싶다면 낮은 수준의 API입니다. 또는 단순화된 API를 원한다면 사용하기가 훨씬 간단하고 대부분의 사용 사례에서 작업을 완료할 수 있습니다. 따라서 간단한 API로 시작한 다음 통합이 완료되면 필요한 경우 더 낮은 수준의 API로 내려갈 것을 권장합니다. 정적 라이브러리에 연결하거나 소스 코드를 가져와서 네이티브 통합을 수행할 수도 있습니다. 그런 다음 Brixelizer 자체에는 여러 가지 함수 진입점이 있는데, 일부는 컨텍스트 관리와 관련이 있고 일부는 기본적으로 거리 필드를 생성하는 것을 의미하는 캐스케이드 관리와 관련이 있습니다. 따라서 이것은 AABB에서 지오메트리를 임포트하는 방법과 업데이트 함수를 호출하는 방법에 대한 주제이기도 합니다. 마지막으로 추적 및 디버깅 기능에 대해 설명합니다. 디버깅을 하려면 거리 필드를 추적해야 하는데, 통합이 성공했는지 여부를 확인해야 하므로 Brixelizer가 이를 도와줄 것입니다.
But how to integrate Brixelizer itself? The basic is that you add the header file, this is kind of the same for every effect, so this ffx_ for Brixelizer it's bx. And there's one peculiarity for Brixelizer, because here are two headers you can choose from. One is the one you're used to, ffx_bx, and then there's also a simple version. And this is because Brixelizer offers two API versions. One is a lower-level API, if you really want to have control over every little single thing. Or if you want a simplified API, it is much simpler to use, and gets the job done for most use-cases. So I recommend to start with the simple one, and then once that's integrated, then you can go down to the lower-level API if needed. You also have the option to either link to a static library, or to just take the source code and do a native integration. Then Brixelizer itself, well there are a number of function entry points, some are related to the context management, then some to cascade management, which basically means to generate the distance field. So this is also a topic of how to import the geometry in the AABBs, how to call the update function. And then lastly, some tracing and debugging functionality. So to debug, you kind of need to trace the distance field, and Brixelizer will help you with this, because it's needed to verify that the integration was successful or not.
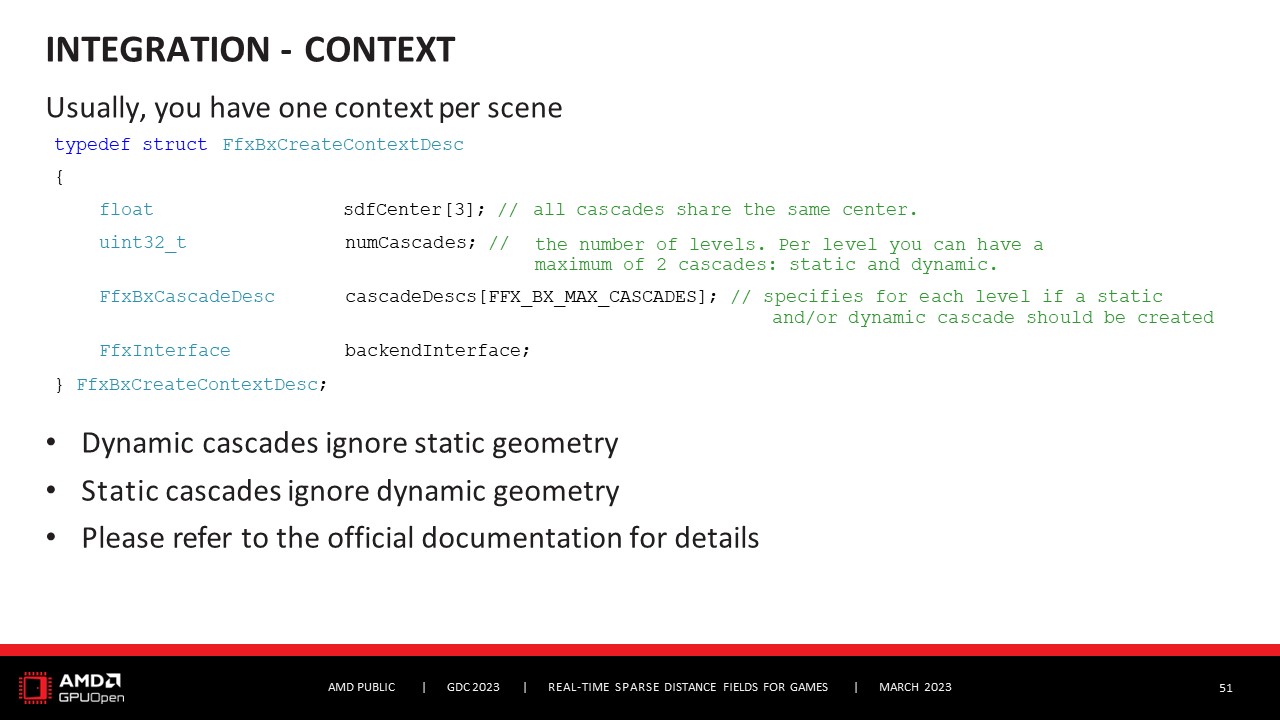
컨텍스트. 따라서 일반적으로 장면당 하나의 컨텍스트가 있으며, 컨텍스트에는 모든 캐스케이드 정보가 있습니다. 따라서 모든 캐스케이드에 대해 공유되는 중심이 있습니다. 그런 다음 캐스케이드 레벨 수가 있습니다. 그리고 각 레벨에 대해 정적 캐스케이드인지 동적 캐스케이드인지 지정할 수 있습니다. 따라서 일반적으로 각 캐스케이드에 정적 캐스케이드와 동적 캐스케이드가 모두 있을 것으로 예상합니다. 하지만 성능상의 이유로 상위 캐스케이드에 동적 캐스케이드를 사용하지 않을 수도 있습니다. 아주 멀리 있는 객체에 대해 동적 객체를 표시하고 싶지 않을 수 있기 때문입니다. 따라서 이 캐스케이드 레벨에 정적 캐스케이드만 지정하려는 사용 사례일 수도 있지만, 일반적으로는 두 가지를 모두 사용합니다. 더 자세한 정보가 필요하면 공식 문서에서 자세한 내용을 확인하시기 바랍니다.
The context. So usually you have one context per scene, and the context will have all the cascade information. So you have a center that is shared for all cascades. Then you have the number of cascade levels. And then for each level, you can specify if you want a static cascade and/or a dynamic cascade. So typically, I would expect that you have both for each cascade, so both a static and a dynamic cascade. But maybe for performance reasons, you don't want a dynamic cascade for the higher ones. So for regions that are far away, because you don't want to display dynamic objects for very far away objects. So this could be one use case, where you only want to specify that this cascade level only has a static cascade, but yeah, typically you have both. If you want to know any more information, please check out the official documentation for details.
컨텍스트와 캐스케이드가 지정되면 캐스케이드를 채우고 업데이트하고 지오메트리를 처리하려고 합니다.
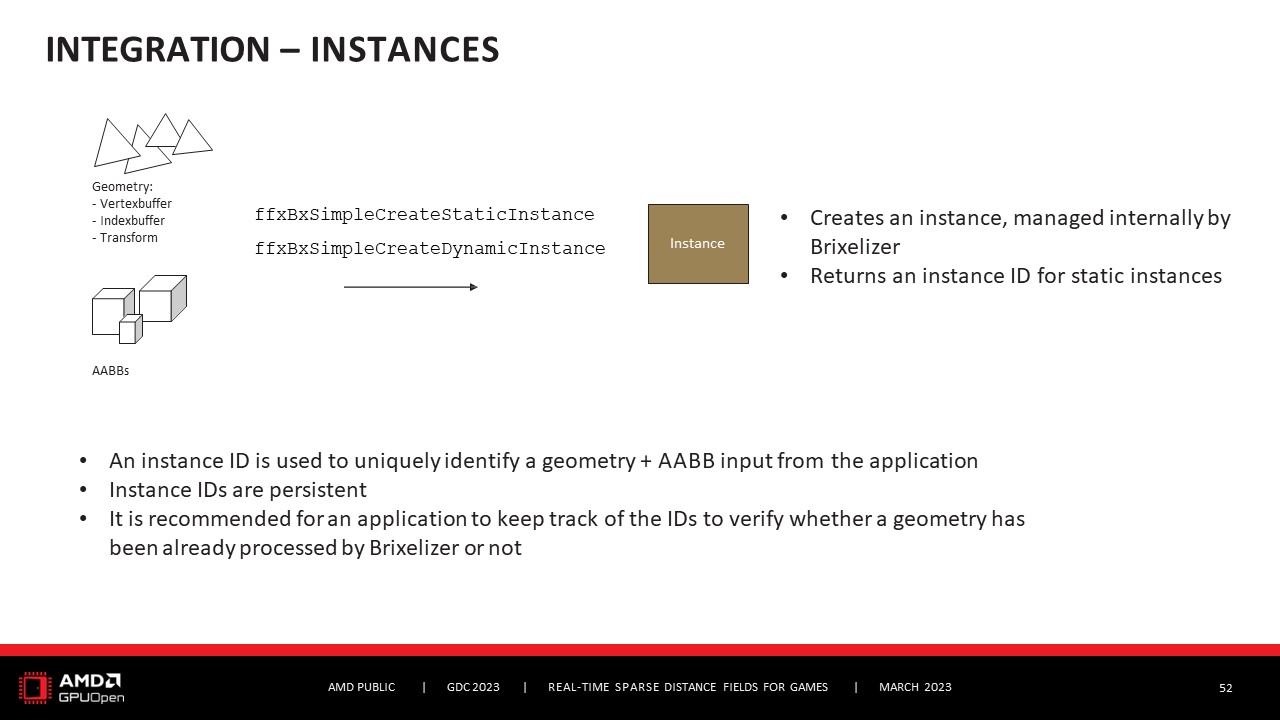
따라서 어떻게든 지오메트리를 브리셀라이저로 가져와야 하는데, 이 작업은 인스턴스를 통해 이루어집니다. 따라서 지오메트리는 버텍스 버퍼, 인덱스 버퍼, 변환 정보를 통해 표현되므로 Brixelizer는 지오메트리가 월드 스페이스에서 어디에 있는지 알 수 있으며, 해당 AABB도 알 수 있습니다.
그리고 이 정보를 사용하여 인스턴스를 생성하고, 인스턴스는 입력에 대한 Brixelizer의 내부 표현입니다.
인스턴스에는 두 가지 유형이 있는데, 하나는 정적 지오메트리를 위한 정적 인스턴스이고 다른 하나는 동적 지오메트리를 위한 동적 인스턴스입니다. 정적 인스턴스의 경우, 지오메트리 단위와 해당 AABB를 고유하게 식별하는 데 사용되는 인스턴스 ID를 반환하며, Brixelizer 내부에서 이 인스턴스의 일반적인 상태 추적을 수행하기 때문에 ID는 영구적이며 애플리케이션이 이를 추적하여 지오메트리가 이미 Brixelizer에서 처리되었는지 여부를 확인하는 것이 좋습니다.
Once we have the context and the cascades specified, we want to populate the cascades and update them and process the geometry.
So we somehow have the geometry to get into Brixelizer, and this is done via instances. So geometry, again, is represented via vertex buffers, index buffers, the transform information so that Brixelizer knows where the geometry is in world space, and also its AABB.
And with this information, you create an instance, and an instance is Brixelizer's internal representation of your input.
There are two different types of instances, one is a static instance for static geometry, and one is a dynamic instance for dynamic geometry. In case of a static instance, Brixelizer will return an instance ID, because this is used to uniquely identify the geometry units and their AABB, and also to do general state tracking of this instance internally in Brixelizer, the IDs are persistent, and it's also recommended that the application takes track of it to verify whether the geometry has been already processed by Brixelizer or not.
정적 인스턴스도 수동으로 삭제해야 하므로 애플리케이션에서 다음과 같이 말해야 합니다: "이 인스턴스를 제거해야 합니다."라고 말해야 합니다.
그 이유는 인스턴스가 갑자기 너무 멀어져서 더 이상 보이지 않기 때문일 수 있습니다. 반정적 지오메트리에 대해서도 파괴되므로 한 가지 예로 문을 들 수 있습니다. 문은 보통 정적인 오브젝트이지만 문이 열리면 갑자기 동적인
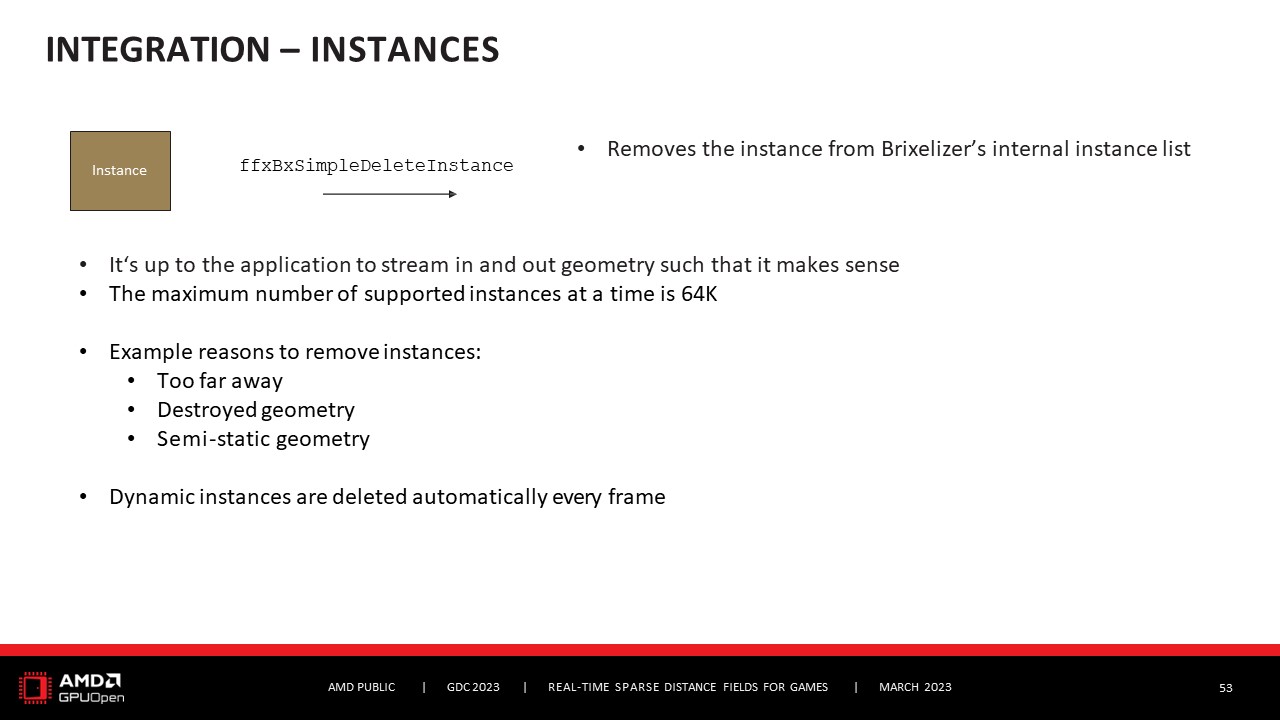
객체로 변하는 경우가 있습니다. 따라서 이러한 유형의 오브젝트는 정적 캐스케이드에 넣은 다음 업데이트 시 인스턴스를 삭제하고 새 인스턴스를 생성한 다음 다시 정적 캐스케이드에 넣으면 됩니다. 하지만 이것이 바로 인스턴스 삭제 함수를 호출하는 또 다른 이유이며, 이렇게 하면 Brixelizer의 내부 인스턴스 목록에서 인스턴스가 제거됩니다. 실제로 이 작업을 적절하게 수행하는 것은 애플리케이션의 책임이므로 애플리케이션이 지오메트리를 적절하게 스트리밍하여 들여오고 내보내야 합니다. 브릭셀이 처리할 수 있는 최대 지원 인스턴스 수는 현재 64,000개입니다. 동적 인스턴스는 한 프레임이 지나면 자동으로 삭제되므로 삭제할 필요가 없습니다. 왜 그럴까요? 동적 인스턴스는 어차피 업데이트할 때마다 처음부터 다시 빌드되므로 동적 인스턴스를 추적할 필요가 없고, 상태를 캐시할 필요도 없습니다.
Static instances also need to be deleted manually, so the application has to say: "Hey, this instance has to be removed."
Reasons for this could be because the instance is suddenly too far away, you don't see it anymore. It's destroyed also for semi-static geometries, so one example would be a door. A door usually is just a static object, but sometimes it suddenly turns into a dynamic
object when a door opens. So these type of objects you want to have in the static cascade, and then on update you simply delete the instance and create a new instance, and put it into the static cascade again. But yeah, this is another reason to call the delete instance function, and this just removes the instance from Brixelizer's internal instance list. And really, to do this appropriately is in the responsibility of the application, so the application has to stream in and out the geometry such that it makes sense. There is a maximum number of supported instances that Brixels can handle, and that is currently at 64,000. Dynamic instances do not need to be deleted, because they are deleted automatically after a frame. Why? Well, you don't need to keep track of dynamic instances, you don't need to cache their state, because they get rebuilt on every update from scratch anyway.
그렇다면 업데이트는 어떻게 하나요? 대략 세 단계로 진행됩니다. 먼저 업데이트 설명을 작성해야 하는데, 이 함수가 업데이트 설명을 채워주므로 이를 위해 ffxBxSimpleBakeUpdate를 호출하면 됩니다. 따라서 인스턴스를 올바른 캐스케이드에 대기열에 추가하며, 이는 소위 작업 목록을 통해 수행됩니다. 따라서 작업 목록은 캐스케이드가 제대로 업데이트되기 위해 어떤 작업을 수행해야 하는지 알려줍니다. 따라서 정적 캐스케이드에 대한 작업 목록이 있고 동적 캐스케이드에 대한 작업 목록이 있습니다. 동적 캐스케이드의 경우 모든 동적 지오메트리만 포함하기 때문에 매우 간단합니다. 정적 캐스케이드의 경우 조금 더 복잡한데, 앞서 설명한 이유 때문에 일부 복셀은 새로운 지오메트리와 교차할 가능성이 있으므로 사전 처리하고 자유로 표시해야 하기 때문입니다. 이를 위해 소위 무효화 작업을 통해 복셀을 지우는 작업을 수행합니다. 그리고 새로운 인스턴스와 파괴된 인스턴스에 대한 무효화 작업이 있습니다. 이러한 무효화 작업은 Brixelizer가 자동으로 생성하므로 전혀 걱정할 필요가 없습니다. 따라서 필요에 따라 새 인스턴스를 생성하고 필요에 따라 삭제하기만 하면 이 모든 무효화 작업이 Brixelizer에 의해 처리됩니다. 하지만 갑자기 머리 없는 고양이가 돌아다니는 것을 방지하기 위해 Brixelizer가 이를 처리해야 합니다. 정적 인스턴스 두 개보다 더 많은 무효화 작업이 있는 경우 Brixelizer는 지름길을 택하여 전체 캐스케이드를 지웁니다. 그리고 전체 캐스케이드를 지우는 것은 동적 캐스케이드의 경우 어차피 수행되므로 매우 간단합니다. 이 ffxSimpleBakeUpdate는 작업 목록을 생성할 뿐만 아니라 캐스케이드 업데이트 설명도 업데이트하여 이를 채웁니다.
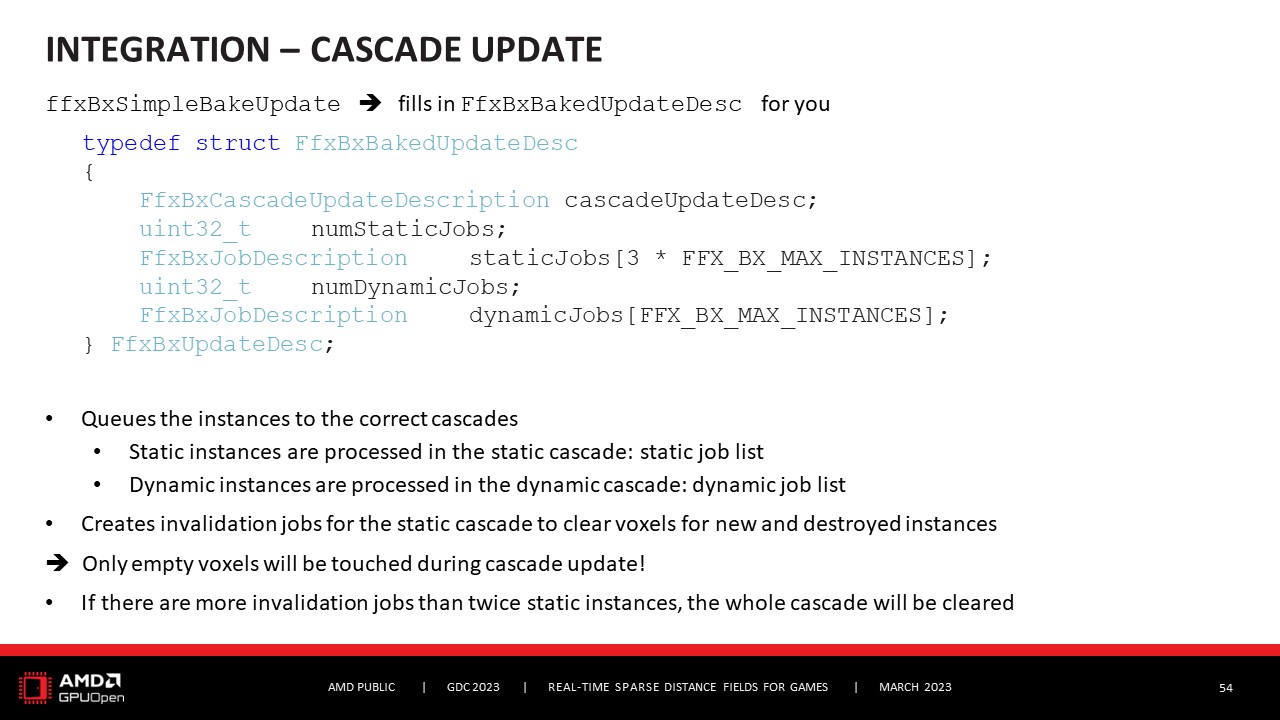
So, how to do the update? This is done roughly in three steps. So first you need to fill out the update description, and to do this you can call ffxBxSimpleBakeUpdate, because this function will populate the update description for you. So it will queue the instances to the correct cascade, and this is done via so-called job lists. So job lists just tells the cascades what jobs need to be done to get properly updated. So we have a job list for the static cascade, and we have a job list for the dynamic cascade. For dynamic cascade, it's pretty simple, because it just contains all the dynamic geometry. For the static cascade, it's a bit more complex, because of the reason that I talked about earlier, some voxels have to be preprocessed and marked as free, because they possibly intersect with new geometry. To do this, we have so-called invalidation jobs, and they just clear the voxels. And we have invalidation jobs for new instances and for destroyed instances. You don't need to worry at all about these invalidation jobs, because Brixelizer will generate them automatically for you. So you just create a new instance as needed, and delete it as needed, and all this invalidation will be handled by Brixelizer. But yeah, Brixelizer needs to handle it to prevent that we don't have headless cats running around suddenly. If we have more invalidation jobs than twice static instances, then Brixelizer will take a shortcut and will just clear the whole cascade. And clearing the whole cascade is done anyway for the dynamic cascade, so it's quite simple. This ffxSimpleBakeUpdate does not only create the job list, but it will also update the cascade update description for you, where it will populate it.
그리고 캐스케이드의 새로운 중심으로 채워집니다. 따라서 카메라가 움직이면 캐스케이드도 움직이고 싶을 것입니다.
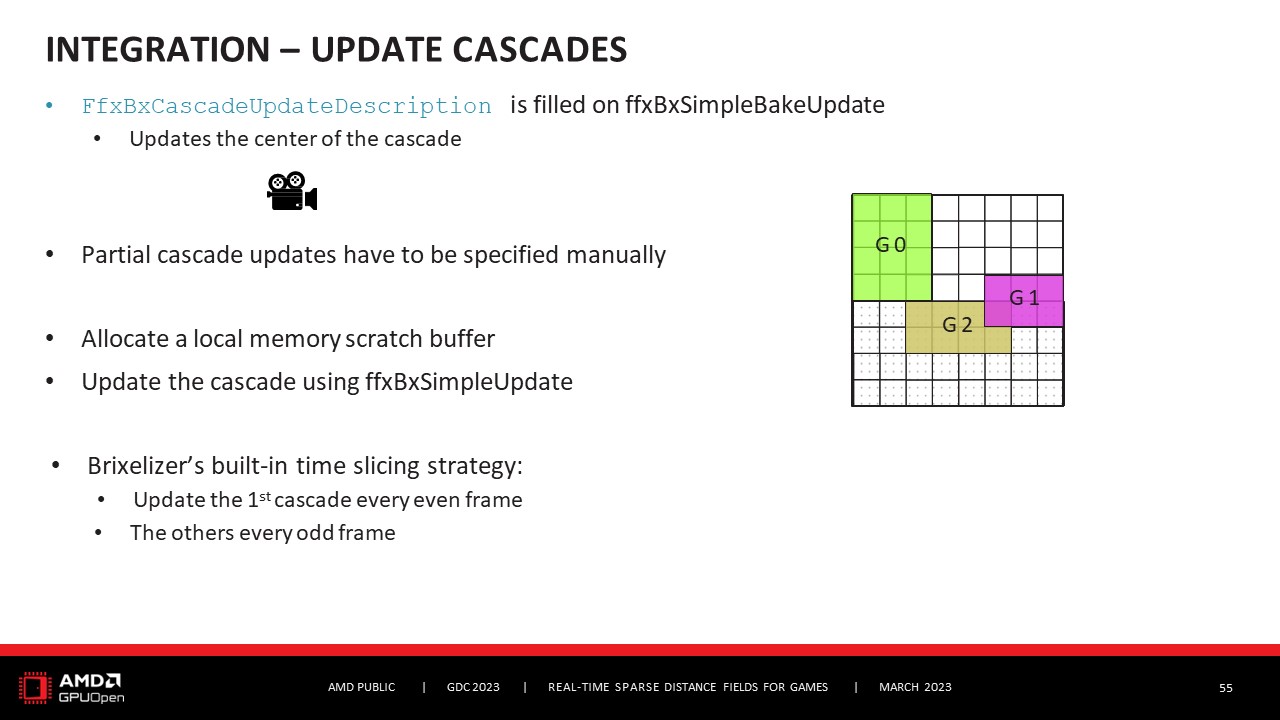
이것이 바로 ffxBxSimpleBakeUpdate가 하는 일입니다. 캐스케이드를 부분적으로만 업데이트하려는 경우 ffxBxSimpleBakeUpdate가 수행하지 않습니다. 이 작업은 수동으로 수행해야 합니다. 자세한 내용은 공식 문서에서 자세한 내용을 확인하세요. 캐스케이드 업데이트 설명이 끝나면 스크래치 버퍼를 위한 로컬 메모리를 할당하고 실제 업데이트를 수행하는 ffxBxSimpleUpdate를 호출합니다. ffxBxSimpleUpdate를 호출하면 Brixelizer는 내장된 시간 분할 전략을 사용하므로 첫 번째 캐스케이드는 짝수 프레임마다 업데이트하고 다른 캐스케이드는 홀수 프레임마다 업데이트합니다. 다른 타임 슬라이싱 전략이 필요한 경우 이 방법도 가능하지만 하위 수준 API에 액세스해야 합니다.
And it will populate it with the new center of the cascade. So the camera moves, you also want to move the cascades.
And that's also what ffxBxSimpleBakeUpdate does for you. What ffxBxSimpleBakeUpdate does not do for you is if you only want to partially update the cascade. This needs to be done manually. If you want to know more, check out the official documentation for details. Once you have the cascade update description, you allocate local memory for the scratch buffer and then you call ffxBxSimpleUpdate, which does the actual update for you. If you call ffxBxSimpleUpdate, Brixelizer will use the built-in time slicing strategy, which means it will update the first cascade every even frame and the others every odd frame. If you need a different time slicing strategy, this is also possible, but then you have to access the lower level API.
자세한 내용은 공식 문서를 참조하세요. 브릭셀라이저는 추적 기능도 지원하므로 디버깅에 사용할 수 있습니다.
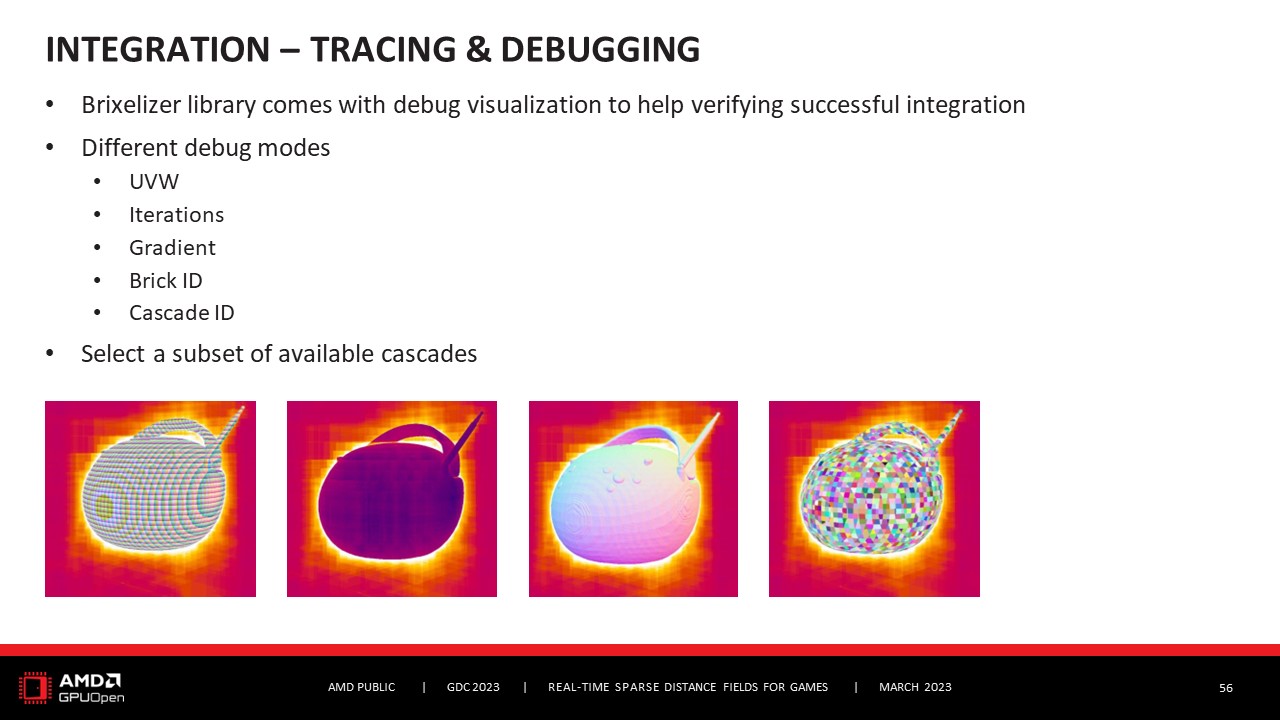
따라서 통합이 실제로 성공했는지 여부를 확인할 수 있습니다. 디버깅 모드에는 거리 필드를 표시하는 방법만 다를 뿐 다양한 디버깅 모드가 있습니다. 따라서 UVW, 추적 중인 반복 횟수, 그라데이션, 브릭 ID로 표시할 수 있습니다.
이 스크린샷은 곧 출시될 샘플의 프리 릴리스 버전에서 가져온 것입니다. 사전 릴리스 버전을 기반으로 한 것이므로 실제 결과물은 약간 다를 수 있습니다. 아직 확실하지는 않지만 비슷할 것입니다. 예를 들어 여기에서 그라데이션이나 브릭 ID의 시각화를 이미 볼 수 있지만 디버깅 기능에서 기대할 수 있는 것입니다.
Again, check out the official documentation for details. Brixelizer also offers support for tracing and this can be used for debugging.
So you can verify that your integration was actually successful or not. There are different debugging modes, just different ways how to display the distance field. So you can display it as UVW, the number of iterations you're tracing to, the gradient, the Brick ID.
These screenshots are taken from a pre-release version of the sample that we will eventually release. Since it's based on a pre-release version, the actual output might be a bit different. That's not clear yet, but yeah, so it will be very similar. So you already can see here the visualization of the gradients, for example, or the Brick ID, but that's what you can expect from the debugging functionality.
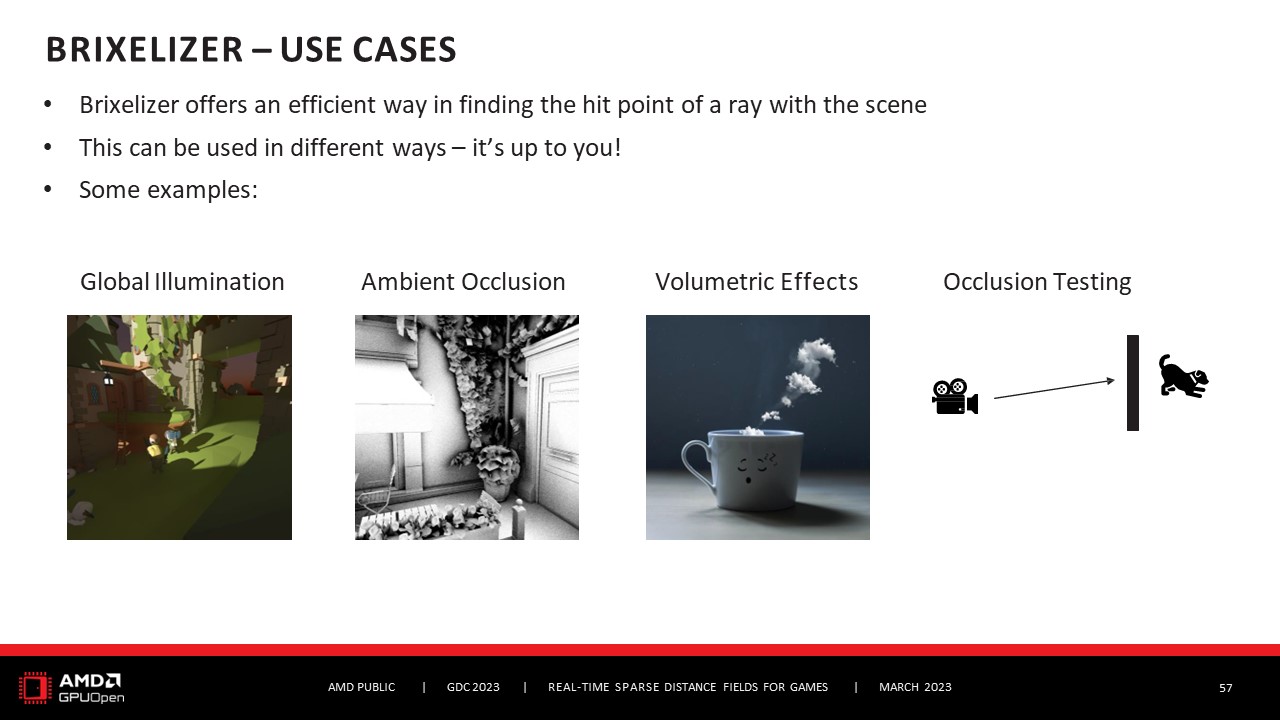
브릭셀라이저는 어떤 용도로 사용할 수 있나요? 브릭셀라이저 자체는 씬에서 광선의 적중 지점을 효율적으로 찾는 데 사용할 수 있는 희소 거리 필드를 생성할 뿐입니다. 히트 포인트로 무엇을 하느냐는 전적으로 사용자에게 달려 있습니다. 예를 들어 글로벌 일루미네이션, 앰비언트 오클루전, 볼류메트릭 효과 또는 오클루전 테스트를 계산하는 데 사용할 수 있지만, 그 외에도 여러분이 생각해낼 수 있는 다른 모든 것이 유효합니다. 솔직히 말씀드리자면 앞으로 여러분이 무엇을 만들어낼지 정말 기대가 됩니다.
For what can you use Brixelizer? Well, Brixelizer itself is just generating the sparse distance field that you then can use to find efficiently the hit point of a ray in the scene. What you do with the hit point is really up to you. Some examples are, you can use it to compute global illumination, ambient occlusion, volumetric effects, or occlusion testing, but also anything else you might come up with is of course valid. To be honest, I'm actually really excited to see what you will come up with in the future.
그래서 저희는 Brixelizer를 사용하여 전역 조명을 계산하는 방법에 대한 연구 작업을 진행했고, 이를 BrixGI라고 불렀습니다. 아직 연구 중이므로 아직 완성된 것은 아니지만 몇 가지 스크린샷이 있습니다.
So we did some research work into how you can use Brixelizer to compute global illumination and we called it BrixGI. So it's still research, so it's not done yet, but we do have some screenshots.
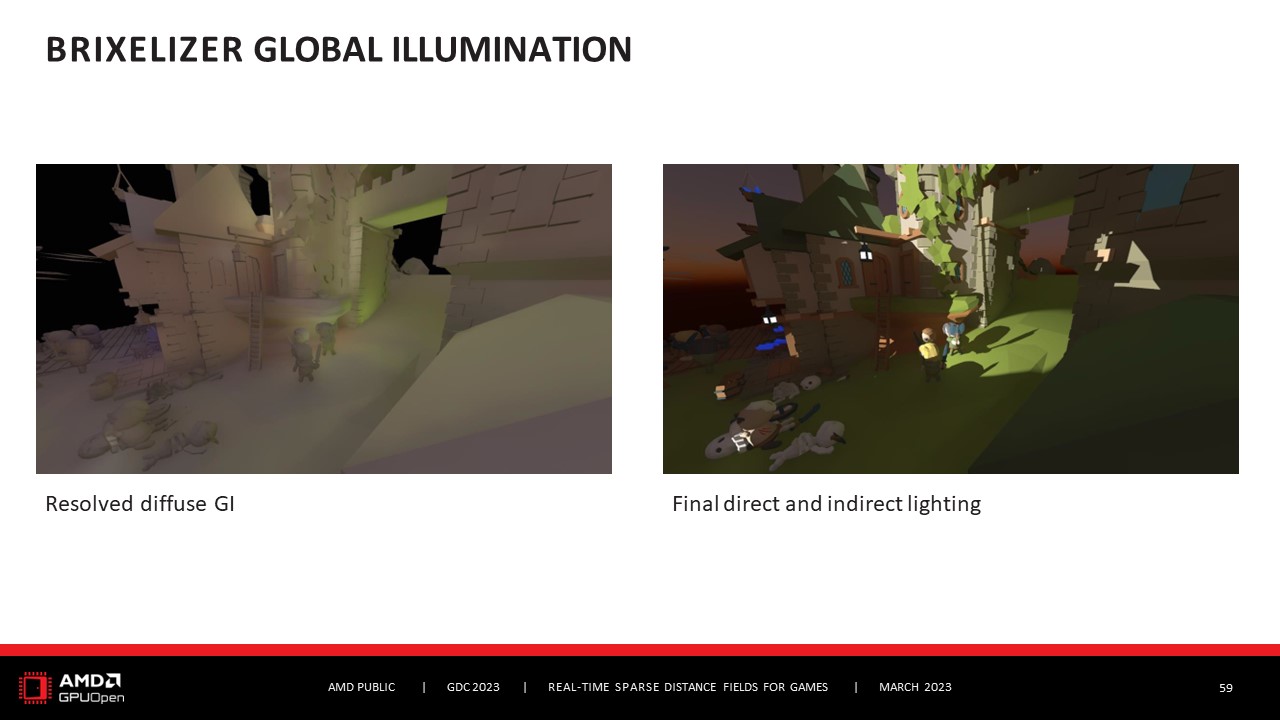
따라서 왼쪽에는 해결된 디퓨즈 GI가 표시되고 오른쪽에는 직간접 조명이 합쳐져 최종 이미지가 만들어집니다.
So on the left you see the resolved diffuse GI and then on the right the combined, so the direct and indirect lighting combined into the final image.
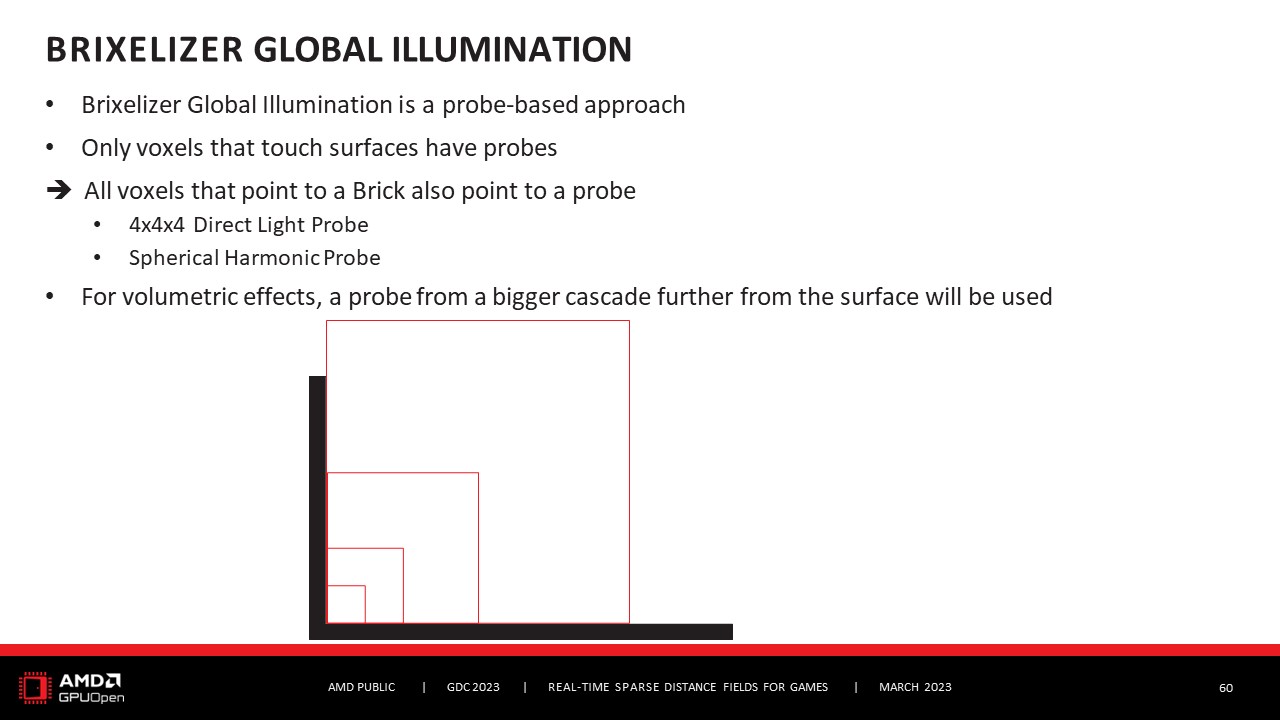
기본 아이디어는 프로브 기반 접근 방식을 사용하는 것이며, 표면에 닿는 복셀에 대한 프로브만 있습니다. 표면에 닿는 복셀은 브릭을 가리키고 다른 프로브, 실제로는 두 개의 다른 프로브도 가리키게 하기 때문에 이 복셀이 누구인지 알 수 있습니다. 그래서 직사광선 프로브와 구형 하모닉 프로브를 추가했습니다. 또한 프로브의 해상도도 사용자가 정의할 수 있으므로 브릭은 8x8x8이지만 BrixGI의 직사광선 프로브는 4x4x4에 불과하다는 것을 알 수 있습니다. 이 접근 방식은 더 큰 캐스케이드의 프로브를 선택하고 더 큰 캐스케이드에서 프로브가 표면에서 더 멀리 떨어져 있다는 것을 의미하므로 체적 효과를 어느 정도 커버할 수 있습니다.
The basic idea is to use a probe-based approach and you only have probes for voxels that touch surfaces. We know who these voxels are because voxels that touch surfaces point to a Brick and we just let them point to another probe, well actually to two other probes as well. So we added a direct light probe and a spherical harmonic probe. You can also see that the resolution of the probe is also user-defined, so while a Brick is 8x8x8, the direct light probe in our BrixGI is only 4x4x4. This approach does cover volumetric effects to some extent because for them a probe from a bigger cascade would be picked and from the bigger cascade means that this probe is further away from the surface.

그런 다음 기본 아이디어는 이전 프레임의 직접광 정보를 채우고 구형 하모닉 프로브를 업데이트하기 위해 GBuffer 표면에서 GI 광선을 쏘고 브릭셀라이저 가속 구조, 즉 먼저 AABB와 브릭의 거리 필드를 통과하도록 하는 것입니다. 그런 다음 GI 광선이 적중 지점을 결정하는 직사광선 브릭에서 샘플링하여 브릭 정보를 업데이트합니다. 이렇게 하면 광선 원점이 표면에 있기 때문에 대부분의 빛 누출을 제거할 수 있습니다.
And then the basic idea is to populate the direct light information from the previous frame and to update the spherical harmonic probe we shoot a GI ray from the GBuffer surface and let it traverse with the Brixelizer acceleration structure, which means first the AABB and then the distance fields in the Bricks. And then we update the Brick information by sampling from the direct light Brick where the GI ray would determine the hit point. This way we get rid of most light leaking because the ray origin is on the surface.
하지만 아직 몇 가지 한계가 있습니다. 첫째, 현재 접근 방식은 기본적으로 화면 공간에서 직사광선 프로브가 업데이트되기 때문에 기본적으로 화면 공간+입니다. 화면 밖 정보로 업데이트하는 실험도 진행 중이지만 장면에 따라 매우 달라지기 때문에 일반적인 경우에 적절한 절충점을 찾기가 매우 어려웠습니다. 또한 시간이 지남에 따라 컨버전스가 보일 수 있으며 작은 지오메트리의 경우 오버쉐이딩이 발생하는 경향이 있습니다. 하지만 앞서 말씀드렸듯이 BrixGI는 아직 개발 중이고 저희도 계속 연구 중이지만, 어쨌든 기본 아이디어를 소개해 드리는 것이 Brixelizer를 어떤 용도로 사용할 수 있는지 더 잘 이해하고 자신만의 솔루션을 생각해내는 데 도움이 될 것이라고 생각했습니다. 이상으로 프레젠테이션을 마치겠습니다.
However, there are still some limitations that we are looking into. First is that the approach right now is basically screen space+ because the direct light probes are updated from screen space. We are also experimenting updating them with out of screen information but it proved to be very scene dependent, so it was very difficult to get a good trade-off for the general case. Also, convergence can be visible over time and it tends to suffer from overshadowing for tiny geometry. But as I said, BrixGI is still under development, we are still doing research on it, but we thought anyway that it's worth presenting the basic idea to you so that you get a better idea of what you can use Brixelizer for and maybe come up with your own solutions. And this is the end of the presentation.
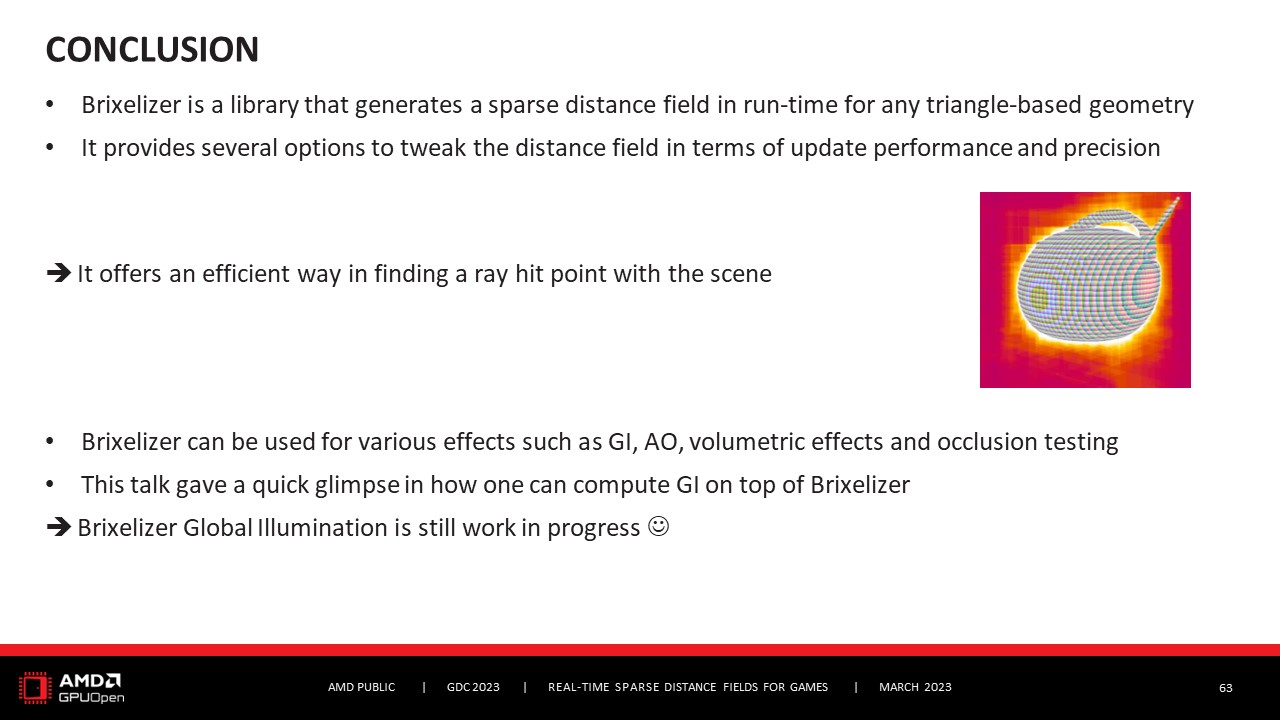
주어진 삼각형 기반 지오메트리에 대해 런타임에 희소 거리 필드를 생성하는 라이브러리인 Brixelizer를 소개해 드렸습니다. 업데이트 성능과 정밀도 측면에서 거리 필드 생성을 조정할 수 있는 몇 가지 옵션이 있습니다. Brixelizer는 씬에서 광선 적중 지점을 효율적으로 찾을 수 있는 방법을 제공합니다. 성능에 중점을 두고 있으며 특히 최고의 정밀도가 필요하지 않은 효과에 적합합니다. 따라서 브릭셀라이저는 장면의 근사치를 제공하므로 정밀도는 다소 떨어지지만 성능은 크게 향상됩니다. 그리고 어떤 효과의 경우 이것이 바로 여러분이 찾고 있는 것일 수도 있습니다. 예를 들어 전역 조명에는 최고 수준의 정밀도가 필요하지 않으며 앰비언트 오클루전에서도 마찬가지입니다. 또한 볼류메트릭 효과를 계산하거나 오클루전 테스트를 할 때도 사용할 수 있습니다. 이 프레젠테이션에서는 브릭셀라이저를 사용하여 전역 조명을 계산하는 한 가지 방법을 소개했습니다. 여러분도 영감을 얻고 자신만의 솔루션을 생각해내는 데 도움이 되길 바랍니다. 브릭셀라이저는 조만간 출시될 예정입니다. GPUOpen을 확인해 주시길 바랍니다. 평소와 같이 발표할 예정입니다. 브릭셀라이저는 FidelityFX의 일부가 될 것이므로 오픈소스가 될 것입니다. 가능한 한 쉽게 통합할 수 있도록 샘플을 제공할 것이며 광범위한 문서화 작업도 진행할 예정입니다.
이제 남은 것은 Brixelizer에 대한 제 강연에 참여해 주셔서 감사하다는 말뿐입니다. 감사합니다.
I presented to you Brixelizer, a library that generates in runtime a sparse distance field for any given triangle-based geometry. There are several options for you to tweak the distance field generation in terms of update performance and precision. Brixelizer is there to offer you an efficient way in finding the ray hit point with the scene. The focus is really on performance and it's especially suitable for effects that don't require the highest precision. So you kind of take a step back in precision since Brixelizer provides an approximation of the scene, but you gain a lot in performance. And for some effect this might just be what you are looking for. For example, global illumination does not need the highest precision, the same for ambient occlusion. You can also use it to compute volumetric effects or to do occlusion testing. In this presentation, I presented to you one way of how you could use Brixelizer to compute global llumination on top. I hope that this serves to you to get inspired and also that you come up with your own solutions. Brixelizer will be released in the near future. I hope you will check GPUOpen. We will announce it as usual. Brixelizer will be part of FidelityFX, so it will be open-source. We will provide a sample and it will be also extensively-documented so that the integration effort is as easy for you as possible.
And now the only thing left to say is thank you for joining in and listening to my talk talking about Brixelizer. Thanks.