역자.
잠깐 본 내용만으로는 실시간 게임 제작에 접목이 가능할지 아직 파악이 안된 고로 지하철에서 아침마다 다시 읽고 그러면 뭔가 아이디어들이 더 생각나지 않을까 하여 공유 해 봅니다.
저자 / David Farrell
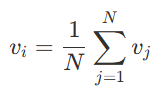
이 블로그 포스트에서는 라플라시안 메시 스무딩을 사용하여 3D 메시를 부드럽게 하고 블러 처리하는 방법에 대해 설명하겠습니다. 이 기술이 유용하게 적용된 좋은 예시로는 제가 라플라시안 메시 스무딩을 이용해 구현한 Adobe Substance 3D Modeler의 스무스 도구가 있습니다. 라플라시안 메시 스무딩은 각 정점을 해당 정점의 이웃 정점들의 평균 위치로 반복적으로 이동시키는 방식으로 작동합니다. 이에 대한 수학적 공식은 다음과 같습니다:
이를 코드로 구현하면 다음과 같습니다:
for (const Vertex& vertex : mesh.vertices)
{
    vec3 avrgPosition = vec3(0);
for (const Vertex& vertexNeighbor : neighbors(vertex))
    {
        avrgPosition += vertexNeighbor;
    }
    avrgPosition /= numNeighbors(vertex);
}
이것을 몇 번 실행하면 메시가 마법처럼 부드러워집니다. 이 과정에서는 메시의 정점 데이터만 변경되고 연결성(삼각형 인덱스)은 변경되지 않는다는 점을 주목해야 합니다.
위 내용은 간단하지만 neighbors()와 numNeighbors() 함수가 필요합니다. 메시의 연결성 정보를 제공하는 하프-엣지 메시 데이터 구조를 구축하는 것이 한 가지 방법이지만, 이 블로그 포스트에서는 각 엣지가 정확히 두 개의 삼각형을 연결하는 이면체(two-manifold) 메시에서 사용할 수 있는 두 가지 대안적 방법을 보여드리겠습니다.
한 번의 순회로 처리하는 방법: 정점 넘기기
이웃 정점 조회를 잊어버리세요. 대신 삼각형 면을 직접 순회하면서, 이면체 메시의 각 엣지가 정확히 두 개의 삼각형을 연결한다는 사실을 활용합니다. 이웃 정점을 미리 계산하는 대신, 면을 한 번 순회하면서 이웃 위치를 실시간으로 누적합니다.
이 과정은 libigl과 같은 라이브러리에서 정점 던지기라고 불립니다. 이는 연결된 이웃들의 정점 위치를 누적하고 평균을 내는 것을 의미합니다. 정점 A, B, C로 이루어진 삼각형에 대해, 우리는 세 개의 방향성 있는 하프-엣지를 정의합니다: A->B, B->C, 그리고 C->A. 이러한 하프-엣지들을 순회하면서, 출발 정점의 위치를 도착 정점의 위치에 누적하고 각 정점이 업데이트되는 횟수를 세어갑니다. 이를 통해 각 정점에 대한 모든 이웃 정점 위치의 합을 계산하게 됩니다. 이 합을 개수로 나누면 새로운 스무딩된 위치를 얻을 수 있습니다.
다음은 구현 코드입니다:
std::vector<vec3> accumulated(mesh.vertices.size(), 0);
std::vector<int> numNeighbors(mesh.vertices.size(), 0);

for (constauto& triangle : mesh.triangles)
{
int vertexIndex0 = triangle.index0;
int vertexIndex1 = triangle.index1;
int vertexIndex2 = triangle.index2;

// vertexIndex0 -> vertexIndex1accumulated[vertexIndex1] += mesh.vertices[vertexIndex0];
    numNeighbors[vertexIndex1]++;

// vertexIndex1 -> vertexIndex2accumulated[vertexIndex2] += mesh.vertices[vertexIndex1];
    numNeighbors[vertexIndex2]++;

// vertexIndex2 -> vertexIndex0accumulated[vertexIndex0] += mesh.vertices[vertexIndex2];
    numNeighbors[vertexIndex0]++;
}

for (int i=0; i<mesh.vertices.size(); i++)
{
    mesh.vertices[i] = accumulated[i] / numNeighbors[i];
}
자, 이렇게 하면 됩니다: 사전 데이터 계산이나 하프-엣지 데이터 구조를 만들 필요 없이 라플라시안 스무딩을 한 번 수행할 수 있습니다.
메시를 더 부드럽게 만들고 싶다면 위 과정을 여러 번 반복하면 됩니다. 그리고 스무딩 과정의 속도를 늦추고 싶다면 부분적인 패스를 사용하면 됩니다:
mesh.vertices[i] = lerp(mesh.vertices[i], accumulated[i]/numNeighbors[i], fractionalAmount);이 방법은 간단하고 효과적입니다.
병렬 처리를 통한 성능 최적화
위의 접근 방식은 단일 스레드 시나리오에서는 잘 작동하지만 멀티스레딩 코드나 GPU에서는 작동하지 않습니다. 문제는 서로 다른 스레드가 accumulated와 numNeighbors 배열에 동시에 쓰기 작업을 수행한다는 것입니다. 이는 변경 가능한 공유 데이터라는 문제가 있는 카테고리에 속합니다. 예를 들어, 서로 다른 스레드가 개별 삼각형을 처리할 때 이 삼각형들이 공유하는 동일한 정점을 동시에 수정할 수 있습니다.
아토믹 혼돈: MESI의 세계
std::vector<std::atomic<vec3>> accumulated(mesh.vertices.size());
std::vector<std::atomic<int>> numNeighbors(mesh.vertices.size());
이 방법을 사용하면 여러 스레드가 스무딩 코드를 병렬로 실행할 수 있습니다. 하지만 아토믹 연산에는 비용이 들고, 캐시 경합으로 인해 CPU와 GPU 모두에서 속도가 저하됩니다. CPU에서 직접 테스트해본 결과, 다중 스레드를 사용하는 이 방식이 단일 스레드의 비아토믹 버전보다 더 느린 것으로 확인되었습니다. 이는 상황에 따라 다를 수 있으므로, 이 방법을 시도하기 전후로 반드시 성능을 프로파일링해보시기 바랍니다.
더 깔끔한 방법: 이웃 정점 미리 계산하기
더 나은 해결책은 이웃 목록을 한 번 미리 계산하고 여러 스무딩 패스에서 재사용하는 것입니다. 다음과 같이 구현할 수 있습니다:
// Find the number of neighbors of each vertexstd::vector<int> numNeighbors(mesh.vertices.size(), 0);
int totalNeighbors = 0;

for (const auto& triangle : mesh.triangles)
{
    numNeighbors[triangle.index0]++;
    numNeighbors[triangle.index1]++;
    numNeighbors[triangle.index2]++;
    totalNeighbors += 3;
}

// Prefix sumstd::vector<int> neighborsStartIndex(mesh.vertices.size(), 0);
int currentIndex = 0;

for (int i=0; i<numNeighbors.size(); i++)
{
    neighborsStartIndex[i] = currentIndex;
    currentIndex += numNeighbors[i];
}

// Populate the neighbors arraystd::vector<int> neighbors(totalNeighbors, 0);
std::fill(numNeighbors.begin(), numNeighbors.end(), 0);

for (const auto& triangle : mesh.triangles)
{
    // vertexIndex0 -> vertexIndex1neighbors[neighborsStartIndex[triangle.index1] + numNeighbors[triangle.index1]] = triangle.index0;
    numNeighbors[triangle.index1]++;

    // vertexIndex1 -> vertexIndex2neighbors[neighborsStartIndex[triangle.index2] + numNeighbors[triangle.index2]] = triangle.index1;
    numNeighbors[triangle.index2]++;

    // vertexIndex2 -> vertexIndex0neighbors[neighborsStartIndex[triangle.index0] + numNeighbors[triangle.index0]] = triangle.index2;
    numNeighbors[triangle.index0]++;
}
이를 통해 스무딩 패스는 각 정점을 병렬로 처리할 수 있습니다.
std::vector<vec3> result(mesh.vertices.size(), 0);

// this for() loop can now operate on each vertex in parallel;// the result[] array holds the new mesh verticesfor (int i=0; i<mesh.vertices.size(); i++)
{
    for (int j=0; j<numNeighbors[i]; j++)
    {
        int neighborIndex = neighbors[neighborStartIndex[i] + j];
        result[i] += mesh.vertices[neighborIndex] / numNeighbors[i];
    }
}
neighbors와 numNeighbors 목록이 한 번 생성되면, 더 이상 수정할 필요가 없습니다.
정점 법선
정점들이 스무딩되면 정점 법선을 다시 계산해야 합니다. 이것도 같은 방식으로 처리할 수 있습니다: 면들을 순회하면서 면 법선을 계산하고, 그 면의 정점들에 전달하면 됩니다.
std::vector<vec3> accumulated(mesh.vertices.size(), 0);

for (const auto& triangle : mesh.triangles)
{
    vec3 v0 = mesh.vertices[triangles.index0];
    vec3 v1 = mesh.vertices[triangles.index1];
    vec3 v2 = mesh.vertices[triangles.index2];
    vec3 faceNormal = normalize(cross(v1-v0, v2-v0));

    accumulated[triangles.index0] += faceNormal;
    numNeighbors[triangles.index0]++;

    accumulated[triangles.index1] += faceNormal;
    numNeighbors[triangles.index1]++;

    accumulated[triangles.index2] += faceNormal;
    numNeighbors[triangles.index2]++;
}

for (int i=0; i<mesh.vertices.size(); i++)
{
    mesh.vertices[i] = normalize(accumulated[i]);
}
더 정확한 결과를 원하신다면 각도 가중치나 면적 가중치를 적용한 법선을 사용하세요. 이것은 또 다른 복잡한 주제이지만, 가중치가 적용된 정점 법선에서 좋은 참고 자료를 찾으실 수 있습니다.
원문
https://nosferalatu.com/LaplacianMeshSmoothing.html
Laplacian Mesh Smoothing by Throwing Vertices
Laplacian Mesh Smoothing by Throwing Vertices
nosferalatu.com
'TECH.ART.FLOW.IO' 카테고리의 다른 글
| 게임 투자자분들의 진솔한 이야기 2 (0) | 2025.04.17 |
|---|---|
| [번역][연재물] 언리얼 엔진 개발 가이드 Part-2 (0) | 2025.04.16 |
| [번역][연재물] 언리얼 엔진 개발 가이드 Part-1 (0) | 2025.04.16 |
| [번역] The Eras of GPU Development (0) | 2025.04.13 |
| Unity Learning Materials by Unity Japan. (0) | 2025.04.09 |